Extreme Site Survey AP Configuration
This post captures useful commands when performing site surveys for configuring access points from Extreme Networks (formerly Aerohive). Sometimes events happen in the field and you need to factory reset or re-configure an AP in the middle of a site survey. What follows are some notes about relevant commands to configure an AP either before or during a site survey. Examples of elements that may require turning include Tx Power, data rates, channel width, QoS, fast transition (11r), and so on.
Of course, you could connect your AP(s) to the internet for accessing the cloud; all this configuration could be set via the cloud management portal or an API. Sometimes, during a site survey, it’s faster and easier to simply tweak the configuration directly via the CLI.
Extreme access points are typically managed via the cloud-based ExtremeCloud IQ engine. Administrators use the cloud portal to configure, manage, and maintain their WLAN environments. Fortunately, Extreme APs also provide a full CLI console which, in theory, could allow administrators to configure, manage, and maintain their WLANs without the need of a cloud portal. It turns out to be “extreme”ly simpler to use the cloud portal to accomplish these tasks. Having full CLI access makes it convenient to setup AP(s) for APoS surveys. The notes below highlight some useful commands to make the site survey experience smoother – or at least the AP configuration aspect of it.
How to reset and AP
! factory reset AP configuration
reset config
Alternatively, you can press and hold the reset button for more than 5 seconds. The LED turns orange after 10 seconds as the AP reboots. My preference is to hold down the reset button and wait for the orange light to appear, but really you just need to hold the reset button for 5 seconds.
Once the reset button is pressed, the following messages appear on the console:
WiFiVitae#  2020-05-02 22:18:39 alert   kernel: [board]: Reset-button pressed!
2020-05-02 22:18:43 alert   last message repeated 4 times
2020-05-02 22:18:44 alert   kernel: [board]: Pressed reset-button over 5 seconds, restore the default factory configuration!
2020-05-02 22:18:46 alert   ah_scd: system: System is rebooting ...
Enable SSID for Site Survey
I like to use separate SSID names for the 2.4 and 5 GHz SSID to avoid inadvertently roaming in between the two SSIDs during the survey.
ssid Survey-2.4
ssid Survey-5
! set disabled (not included), optional and mandatory (basic) rates
ssid Survey-2.4 11g-rate-set 12-basic 18 24-basic 36 48 54
ssid Survey-5 11a-rate-set 12-basic 18 24-basic 36 48 54
interface wifi0 ssid Survey-2.4
! set wifi1 to access-only mode (default: dual)
interface wifi1 mode access
interface wifi1 ssid Survey-5
radio profile radio_ng0_SS
radio profile radio_ng0_SS phymode 11ng
! prevent channel changing based on interference threshold
radio profile radio_ng0_SS acsp interference-switch disable
! disable off-channel scanning
no radio profile radio_ng0_SS scan access
radio profile radio_ax0_SS
! set PHY mode for radio profile
radio profile radio_ax0_SS phymode 11ax-5g
! set channel width for radio profile
radio profile radio_ax0_SS channel-width 40
! prevent channel changing based on interference threshold
radio profile radio_ax0_SS acsp interference-switch disable
! disable off-channel scanning
no radio profile radio_ax0_SS scan access
no radio profile radio_ax0_SS backhaul failover
! bind radio profile to radio interface
interface wifi0 radio profile radio_ng0_SS
interface wifi1 radio profile radio_ax0_SS
! prevent AP from rolling back config if NOT able to connect to Cloud
Configure WPA2 on SSID
security-object SurveyUser
security-object SurveyUser security protocol-suite wpa2-aes-psk ascii-key W1F1v!ta3
ssid Survey-2.4 security-object SurveyUser
ssid Survey-5 security-object SurveyUser
AP Channel and Tx Power
Show current radio transmit power and channel:
WiFiVitae#sh acsp

Interface Channel select state  Primary channel  Channel width Power ctrl state      Tx power(dbm) Use Last Selection
--------- --------------------- ---------------- ------------- --------------------- ------------- ---------------------
Wifi0     Enable                6                20            Disable(User disable) 8*            Channel:No  Power:No
Wifi1     Enable                157              40            Disable(User disable) 14*           Channel:No  Power:No
Set radio transmit power and channel:
interface wifi0 radio channel 6
interface wifi0 radio power 8
interface wifi1 radio channel 157
interface wifi1 radio power 14
View AP Hostname in Beacon Frame
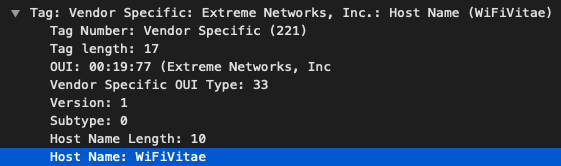
Enable device name/hostname to be included in beacon frames:
system hostname-in-beacon enableThe device known is reflected in Vendor Specific Tag (221): Extreme Networks, Inc. as shown below:
Enable DHCP Server on AP
! statically assign mgmt IP address for AP
interface mgt0 ip 192.168.40.69 255.255.255.0
! default route
ip route net 0.0.0.0 0.0.0.0 gateway 192.168.40.1
! disable DHCP for management interface
no interface mgt0 dhcp client
interface mgt0.2 vlan 100
interface mgt0.2 ip 10.0.0.1/24
interface mgt0.2 dhcp-server options netmask 255.255.255.0
! dns server provided to WLAN clients in DHCP response
interface mgt0.2 dhcp-server options dns1 1.1.1.1
interface mgt0.2 dhcp-server options vendor-specific VCI AEROHIVE
interface mgt0.2 dhcp-server ip-pool 10.0.0.10 10.0.0.15
interface mgt0.2 dhcp-server enable
security-object SurveyUser default-user-profile-attr 100
user-profile SurveyUser qos-policy def-user-qos vlan-id 100 attribute 100
Issuing the “show interface” command will let you know to which sub-interface to apply the DHCP config. Sub-interfaces are assigned in order of SSID creation.
WiFiVitae#sh int
State=Operational state; Chan=Channel;
Radio=Radio profile; U=up; D=down;

Name           MAC addr      Mode   State  Chan(Width)  VLAN   Radio      Hive        SSID
----------- -------------- -------- ----- ------------- ---- ---------- ---------- ----------
Mgt0        3485:840a:8dc0    -       U     -              1     -        hive0        -
Mgt0.2      3485:840a:8dc0    -       U     -            100     -        hive0        -
Agg0        3485:840a:8dc3 backhaul   D     -              1     -        hive0        -
Eth0        3485:840a:8dc0 backhaul   U     -              1     -        hive0        -
Eth1        3485:840a:8dc1 backhaul   D     -              1     -        hive0        -
Red0        3485:840a:8dc2 backhaul   D     -              1     -        hive0        -
Wifi0       3485:840a:8dd0 access     U       6(20MHz)     - radio_n...     -          -
Wifi0.1     3485:840a:8dd4 access     U       6(20MHz)     - radio_n...   hive0    Survey-2.4
Wifi0.2     3485:840a:8dd5 access     U       6(20MHz)     - radio_n...   hive0     WiFiVitae
Wifi1       3485:840a:8de0 access     U     157(40MHz)     - radio_a...     -          -
Wifi1.1     3485:840a:8de4 access     U     157(40MHz)     - radio_a...   hive0     Survey-5
Wifi1.2     3485:840a:8de5 access     U     157(40MHz)     - radio_a...   hive0     WiFiVitae
Adjust LED settings
Sometimes you may want to make the LED a little more obvious. You can change the brightness, colour, or make it blink.
system led brightness {bright|soft|dim|off}
! newer APs support only amber|white
! White fast-blink provides good contrast for a quick look
_led color {off|green|orange|red|amber|white} {no-blink|slow-blink|fast-blink}
! relevant for early hardware versions of AP130/230 APs
system led power-saving-mode [ delay <number> ] [ on <number> off <number> ]
AP network settings (Optional)
Optional configuration depending on what clients are connected to the APoS. Typically, NOT necessary.
dns server-ip 1.1.1.1
dns server-ip 8.8.8.8 second
dns server-ip 208.67.222.222 third

ntp server 0.ca.pool.ntp.org
ntp server 1.ca.pool.ntp.org second
ntp server 2.ca.pool.ntp.org third
Virtual Access Console (VAC)
Extreme APs have a really cool feature allowing them to enable a Virtual Access Console (VAC) that is always on, or triggered by, certain conditions; for example, the AP can no longer reach the default gateway. With a network issue, the virtual access console can be enabled allowing administrators to connect directly to an access point over Wi-Fi as if they were plugged into the console port. The feature is OFF by default, so definitely turn this feature on within your network policy during initial deployment. Do this especially if you have APs deployed in hard to reach locations, such as those mounted on warehouse ceilings, telephone poles, outside walls, or any location that requires special equipment to access. There is also an option to disable “production” SSIDs when the failure condition is detected. This prevents STAs from connecting to the AP and having their traffic black holed due to broken upstream network connectivity.
Once triggered, the virtual access console enables an SSID advertised on both Wi-Fi radios. The SSID name is the AP hostname followed by “_ac” (i.e “WiFiVitae_ac”). Note the “ac” stands for “access console”, no relation to 802.11ac. This SSID may be used for site survey purposes but configuration tuning is somewhat limited. QoS and roaming features cannot be tuned.
I prefer to configure a “production” SSID to be used during the site survey; however I also enable the VAC in case console access is required to configure the access point throughout the survey process.
! VAC will add “_ac” to end of hostname in SSID by default
hostname WiFiVitae
! optional – set a custom SSID name for VAC
access-console custom-ssid WiFiVitae
! enable WPA2
access-console security protocol-suite wpa2-aes-psk ascii-key W1F1v!ta3
! login credentials to AP
admin root-admin admin password W1F1v!ta3
! permanently enable virtual access console
access-console mode enable


wifivitae#sh int wifi0.1
SSID=service set identifier; MTU=maximum transmission unit; RTS=request to send;
DTIM=delivery traffic indication message; WMM=Wi-Fi Multimedia;
UAPSD=unscheduled automatic power save delivery; AC=access console;

Mode=access; SSID configured="WiFiVitae"; SSID="WiFiVitae";
Admin state=enabled; Operational state=up; WMM state=enabled; AC state=enabled;
WEB server=disabled; DHCP server=enabled; DNS server=disabled; UAPSD=disabled;
IP addr=198.18.2.1; Netmask=255.255.254.0;
Internal station traffic state=enabled;
Mac addr=3485:840a:8dd4; MTU=1500;
Freq(Chan)=2437Mhz(6);
RTS threshold=2346; Fragmentation threshold=2346; DTIM period=1; Max clients number=2;
Hide SSID=no; Ignore broadcast probe=no; Client age out (in minutes)=5;
11g rate set=1M(b) 2M(b) 5.5M(b) 6M 9M 11M(b) 12M 18M 24M 36M 48M 54M;
11ax rate set=mcs0/1 mcs1/1 mcs2/1 mcs3/1 mcs4/1 mcs5/1 mcs6/1 mcs7/1 mcs0/2 mcs1/2 mcs2/2 mcs3/2 mcs4/2 mcs5/2 mcs6/2 mcs7/2 mcs0/3 mcs1/3 mcs2/3 mcs3/3 mcs4/3 mcs5/3 mcs6/3 mcs7/3 mcs0/4 mcs1/4 mcs2/4 mcs3/4 mcs4/4 mcs5/4 mcs6/4 mcs7/4 mcs8-11/1 mcs8-11/2 mcs8-11/3 mcs8-11/4;
Rx packets=0; errors=0; dropped=116;
Tx packets=0; errors=0; dropped=  1;
Rx bytes=0 (0 B); Tx bytes=0 (0 B);
Note: The VAC will not be advertised on wifi1 when operating in “dual” mode. All SSIDs must be removed from an interface prior to changing the setting. To switch operating mode, enter:
interface wifi1 mode accessPutting it all together

Wi-Fi Explorer screen grab confirming some SSID config
Below is an aggregate of all the syntax from above:
radio profile radio_ng0_SS
radio profile radio_ng0_SS phymode 11ng
radio profile radio_ng0_SS acsp interference-switch disable
no radio profile radio_ng0_SS scan access
no radio profile radio_ng0_SS backhaul failover
radio profile radio_ax0_SS
radio profile radio_ax0_SS phymode 11ax-5g
radio profile radio_ax0_SS channel-width 40
radio profile radio_ax0_SS acsp interference-switch disable
no radio profile radio_ax0_SS scan access
no radio profile radio_ax0_SS backhaul failover
security-object SurveyUser
security-object SurveyUser default-user-profile-attr 100
ssid Survey-2.4
ssid Survey-2.4 security-object SurveyUser
ssid Survey-2.4 11g-rate-set 12-basic 18 24-basic 36 48 54
ssid Survey-5
ssid Survey-5 security-object SurveyUser
ssid Survey-5 11a-rate-set 12-basic 18 24-basic 36 48 54
interface wifi0 radio profile radio_ng0_SS
interface wifi0 radio power 8
interface wifi1 radio profile radio_ax0_SS
interface wifi1 mode access
interface wifi1 radio power 14
interface wifi0 ssid Survey-2.4
interface wifi1 ssid Survey-5
interface mgt0.2 vlan 100
interface mgt0.2 ip 10.0.0.1/24
no system led power-saving-mode
access-console custom-ssid WiFiVitae
access-console mode enable
system hostname-in-beacon enable
hostname WiFiVitae
interface mgt0 ip 192.168.40.69 255.255.255.0
ip route net 0.0.0.0 0.0.0.0 gateway 192.168.40.1
no interface mgt0 dhcp client
interface mgt0.2 dhcp-server options netmask 255.255.255.0
interface mgt0.2 dhcp-server options dns1 1.1.1.1
interface mgt0.2 dhcp-server options vendor-specific VCI AEROHIVE
interface mgt0.2 dhcp-server ip-pool 10.0.0.10 10.0.0.15
interface mgt0.2 dhcp-server enable
dns server-ip 1.1.1.1
dns server-ip 8.8.8.8 second
dns server-ip 208.67.222.222 third
ntp server 0.ca.pool.ntp.org
ntp server 1.ca.pool.ntp.org second
ntp server 2.ca.pool.ntp.org third
user-profile SurveyUser qos-policy def-user-qos vlan-id 100 attribute 100
Slàinte!
Ahmamd
troymart