What should you think about when performing Access Point on a Stick (APoS) measurements?
What is an APoS?
“AP on a Stick” (APoS) is a wireless network testing method where one or more access point(s) (AP) are temporarily mounted on a pole, tripod, or other portable structure to simulate a permanent deployment. This setup is used to evaluate wireless coverage, signal strength, and performance in a specific area before permanently installing multiple access points. APoS helps network practitioners assess the optimal placement of APs in environments like large buildings, campuses, or warehouses, ensuring efficient coverage and connectivity without committing to the full cost of infrastructure installation upfront.
Why use APoS?
Wireless practitioners use AP on a Stick (APoS) to conduct site surveys and ensure optimal wireless coverage before approving permanent installation; it is a risk reduction technique. By temporarily positioning an access point, they can evaluate real-world signal strength, interference, and coverage in different locations. This helps them determine the ideal placement for access points to minimize dead zones, avoid over-provisioning, and ensure seamless Wi-Fi performance. APoS is a cost-effective, time-saving method to test wireless environments, reducing the need for costly adjustments after full deployment.
What should I measure?
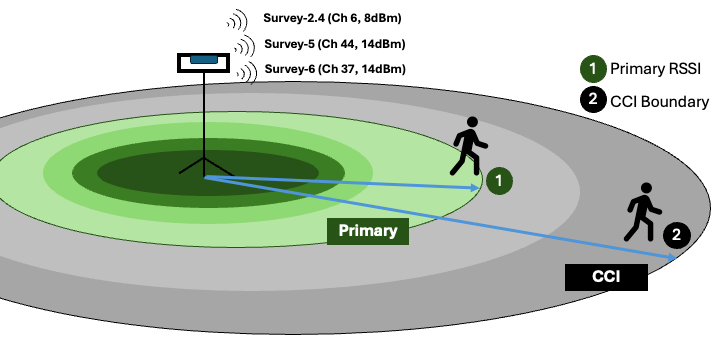
You can use APoS as part of the wall attenuation measure procedure or you can use APoS to confirm the RF coverage and signal propagation from your test AP and location. In the latter, you should move away from you APoS while measuring the boundary of two design thresholds. Measure the edge of the cell coverage you want in your design. This is the target primary RSSI coverage and could be a value from -62 dBm to -72 dBm, depending on design requirements. Also measure the edge of the co-channel interference (CCI). This is the CCI overlap threshold and could be a value from -82 dBm to -105 dBm, depending on design requirements and received sensitivity of your APs.

What should I include in my APoS kit?
Access Points: Use the same access point and antenna model from you RF predictive design. Every AP and antenna model produce different propagation patterns.
Antennas: Like access points, use the same models for APoS as used in the predictive design. It is always a good idea to carry multiple antenna models with different gain and beamwidth in case you need to capture data using antennas with alternate patterns.
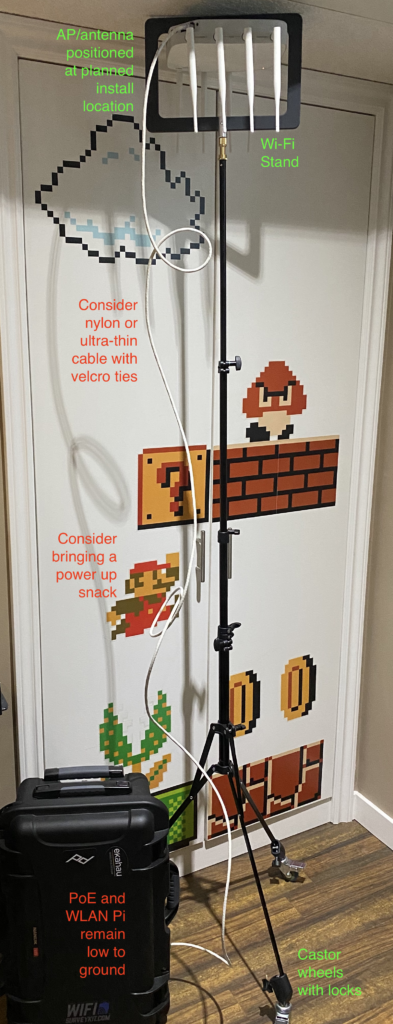
Tripod: Ensure your tripod can be raised high enough to match the height at which the APs will permanently be mounted. If the warehouse ceiling height is 8m, there is no value to measuring an APoS at 2m. Caster wheels allow easy maneuverability. Consider casters with wheel locks so your APoS does not roll around while your collecting measurements in other rooms.
PoE battery: Powering the APoS is a critical requirement. Double check the PoE requirements of the AP to ensure full radio performance during the survey. Look for battery packs that charge over USB-C and can provide 24V DC in addition to 48V PoE. Consider bringing a second PoE battery in case the first one fails or runs out of juice. Keep the PoE battery as low on the tripod as possible to reduce weight at elevation, which could lead to unbalance and tipping.
Server(s): Consider bringing a portable server that can provide DHCP or act as an iPerf server. You should have a WLANPi for this purpose.
Mounting accessories: Include easy to assemble mounting options for AP and antennas accessories. The “WiFi Stand” includes a T-rail mount allowing easy mounting for any enterprise grade AP. Alternate accessories may be required to secure and attach directional antennas.
Camera: Documentation is important, and pictures are worth 1000 words. Even better when your survey software can easily incorporate pictures and link them to APs or locations on the floor plan.
Ethernet cables: Ensure your cables are long enough. Consider braided cables to reduce tangling or ultra-thin cables to reduce weight on the APoS and during transport. Consider using different colours to easily identify different lengths.
Laser measure: While on-site, validate floorplan dimensions using a laser distance measurer. Measure as long a distance as possible – hallways, corridors, large conference/auditoriums. Avoid small measurements like doors. Consider a laser distance measure with Bluetooth as there a several iOS/Android apps that sync over Bluetooth. Also consider USB charging to avoid the need to carry around AAA batteries.
Survey software and configuration: For consistent results, perform the survey using the same method each time, following survey best practices. Always check settings to ensure, desired channels and bands are being scanned. Consider configuring a separate SSID for each band to avoid any inter-band roaming as you measure the edge of the cell.
Food: No one wants to be a hangry surveyor. Remember to pack a Snickers bar, protein bar, or some other portable snack with a good shelf life.
Remember to charge all your equipment the night before going to site: battery packs, tablets, measuring devices, cameras, laser distance measures, EVERYTHING. It is also a good idea to log in to all software and make sure your accounts and licenses are current. It may be difficult to resolve this the while on-site if you have limited or no internet access.

Slàinte!
Resources
WLANPi
Wi-Fi Stand (also includes survey kits)
Vantage Wi-Fi Site Survey Tripods (extended height)
Battery Packs Acceltex
Battery Packs Ventev (VenVolt)