Atom is a powerful and customizable text editor, supported across the primary operating systems (MacOS/Windows/Linux). There are many text editors out there, but to keep things consistent for new Python developers, Atom was selected. It also doesn’t hurt that Atom is available at no cost. The entire Atom editor is free, open source, and available under the https://github.com/atom organization.
ATOM can be downloaded via atom.io, which will automatically recognize your OS and offer the appropriate image for download in and installation.
This blog is based off the YouTube video produced by @CorreyMSchafer, which can be found in the link below. It does not capture all of the customization BLHA goes through and is an attempt to translate tips from the video into text format to follow and re-create across multiple machines.
Atom customization that will be covered includes:
- Script plugin
- Adjusting tab length
- Python environment
- File icons
- Minimap
- PEP8 syntax compliance
After launching Atom, the first screen looks similar to this, where you can find links to help documentation, quick links open projects and interact with GitHub:
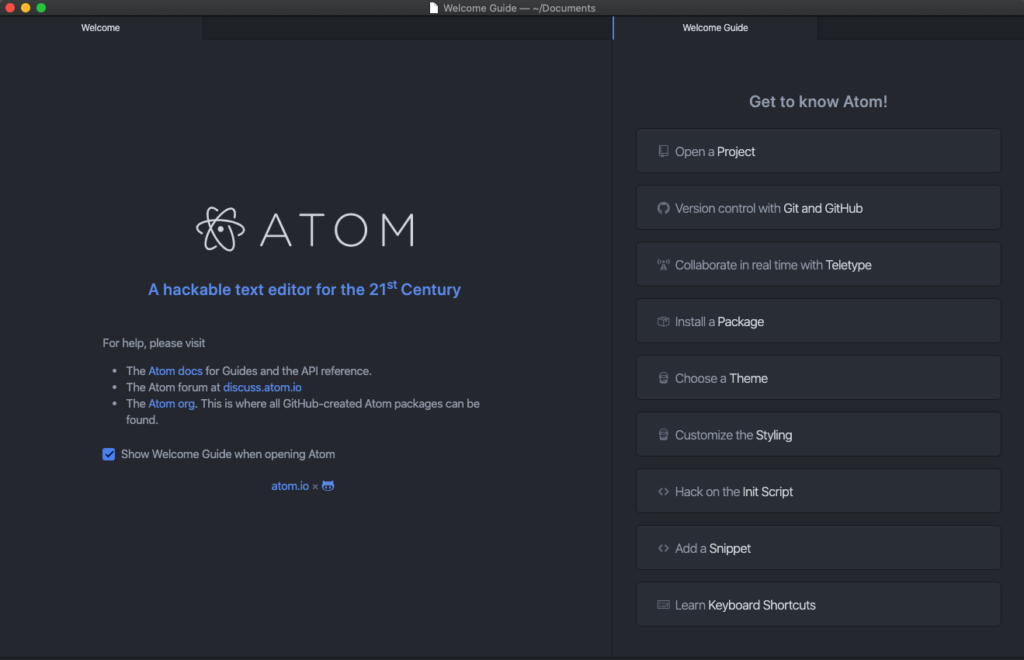
Opening screen in ATOM.io
You can also add a folder structure to Atom, making it easy to open and access project files. Click on the arrow that appears on the left midway in the window. Once this section expands, you can drag your file structure into the project tab as shown below:
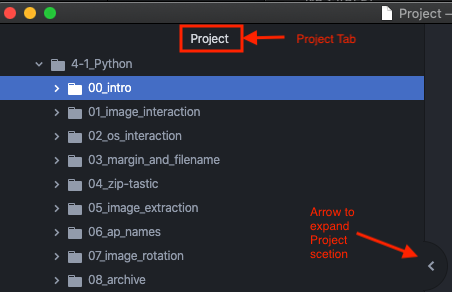
Adding file structure.
Script Package
Of course, you can run your Python script from the terminal, but you can also run those scripts from within the Atom editor. To accomplish this, the “Script” package needs to be installed.
On a MAC, select Atom > Preferences > Install.
On Windows, select File > Settings (or press ctrl-,(comma)) > Install.
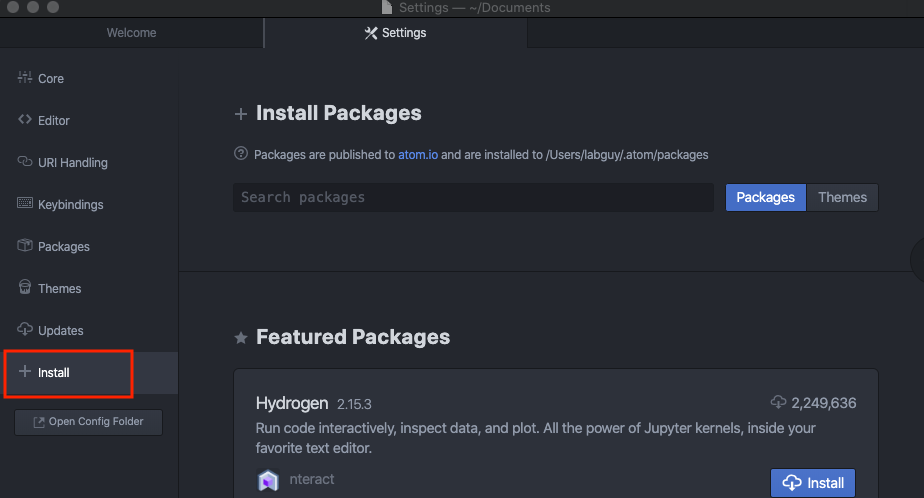
Ensure the ‘Packages’ button is selected.
Type ‘script’ in the ‘Search packages’ field.
Choose the script package 3.31.1+ with over 3.5M downloads and click ‘Install’.

Once installation is complete the buttons will change allowing you to modify settings, uninstall the package, or disable it.
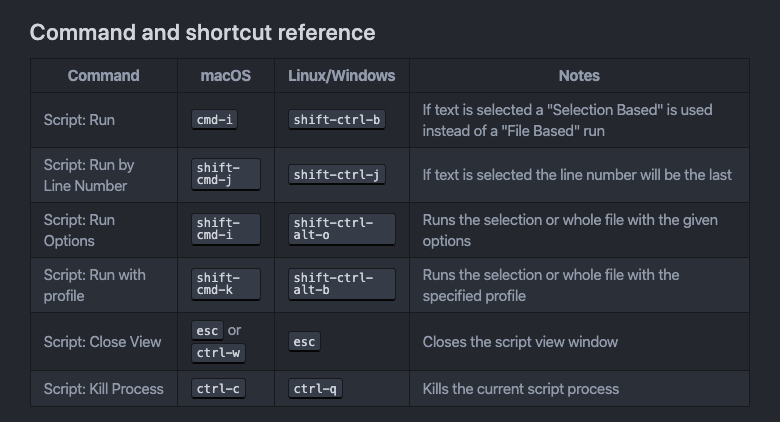
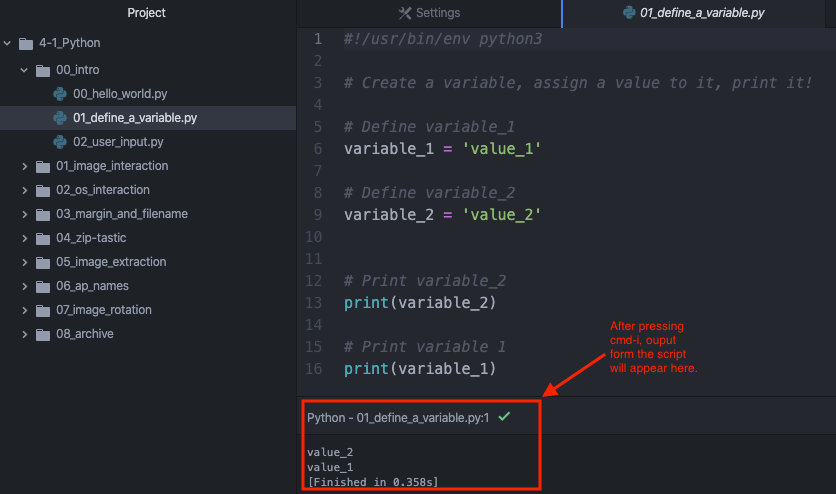
Clicking on ‘Settings’ will allow you to modify some of the settings. We are not going to modify any of the settings, but rather look at the table of keyboard shortcuts. Click on the ‘Settings’ button and scroll down toward the bottom until you reach the ‘Command and shortcut reference’ section. Here you will see that pressing “cmd-i” (MAC) or ‘shit-ctrl-b (on Linux/Windows) will execute the script.
Returning to your Python project and entering the OS specific hotkey to run the script will display the output of the script in the lower portion of the Atom.
Adjust Tab Length
Python is pretty picky about white space. If you want to ease your journey toward becoming a Pythonista you may want to set the tab button to automatically comply with Python guidelines where the tab button will automagically add 4 spaces when pressed.
To do this, open settings by clicking Atom > Preferences > Editor.
Scroll down to Tab Length and change the ‘Tab Length’ from 2 (default) to 4.
In addition, set the ‘Tab Type’ to soft so that spaces are added (not a tab character) when the tab key is pressed.

Python environment
Setting up the environment to run the expected version of Python is an important step if you want to run your scripts from within Atom. Prior to Big Sur, all versions of MAC included Python v2 and it was necessary to add Python v3 (the version we should really be using). If you have multiple versions of Python running on your machine and you want to run scripts from within Atom, these next steps are for you:
Cmd-shift-p to bring up command palate (MAC)
Ctrl-shift-p to bring up command palate (Windows)
Type ‘script’ in the search bar.
Choose Script: Run Options
or
Shift-Cmd-I (MAC)
Ctrl+Alt+Shift+O (Windows)

In the command field, enter the path of your python application.
/usr/bin/pytyhon3 (MAC – Python3)
/usr/bin/pytyhon2.7 (MAC – Python2)
(Windows)
Select ‘Save as profile’.

Enter a profile name (e.g. Python3)

To run ‘script: run-with-profile’, enter the OS specific hotkey below:
Shift-cmd-K (MAC)
Ctrl+alt+shift+B(Windows)
Choose the profile to run and select ‘Run’.

File Icons
You can change the icon displayed next to the file in the project tab. This can make it a little easier to see the types of files and quickly determine which file you’re intending to click on.
To do this, open settings by clicking Atom > Preferences > Install
Ensure the ‘Packages’ button is selected.
Type ‘File Icon’ in the ‘Search packages’ field.
Choose the ‘file-icons’ package 2.1.47+ with over 9.3M downloads and click ‘Install’.

Once complete, file icons/types should be more distinctive.

Minimap
This is useful as your scripts grow in length. A small window, whose location is configurable, will be displayed to quickly identify where you are in your script in reference to the full body of your script.
To do this, open settings by clicking Atom > Preferences > Install
Ensure the ‘Packages’ button is selected.
Type ‘minimap’ in the ‘Search packages’ field.
Choose the script package 4.39.13+ with over 7M downloads and click ‘Install’.

Returning to one of your script tabs will reveal a minimap in the upper right corner. As you scroll through your code, the position will be reflected in the minimap. Hovering over the minimap brings up a settings button where you can adjust the position of the minimap.

PEP8 syntax compliance
You can read more about PEP8 on at Python.org, but it is basically the style guide for Python code. The PEP8 package allows you to automatically apply style guide rules to your code and reformat the structure as you save the script. This automates maintaining a consistent and PEP8 compliant script for you.
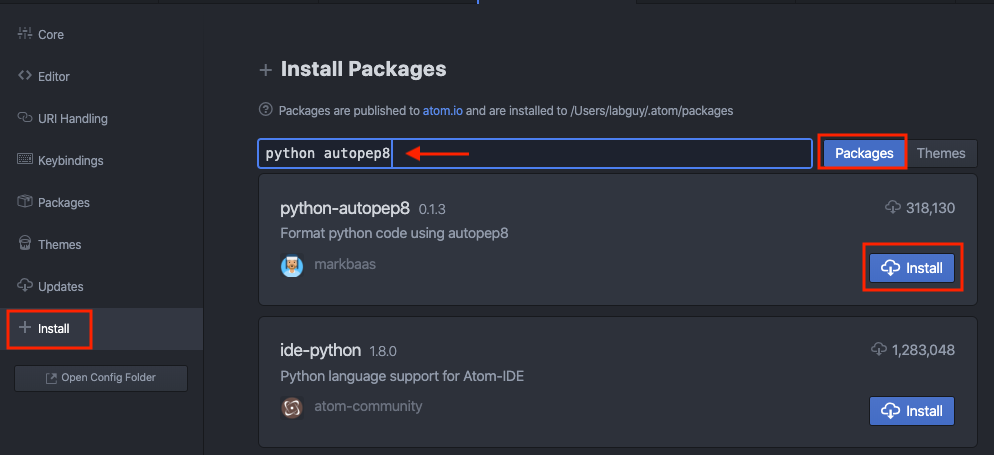
To do this, open settings by clicking Atom > Preferences > Install
Ensure the ‘Packages’ button is selected.
Type ‘python autopep8’ in the ‘Search packages’ field.
Choose the ‘python-autopep8’ and click ‘Install’.
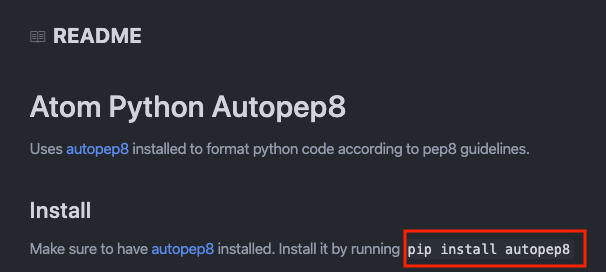
Python-autopep8 does have some dependencies that need to be installed in order to function. Fortunately, clicking on ‘settings’ once the package is installed documents the single command that needs to be entered, or you can just let Atom automatically enter the command for you when installing the package.

Here is the command for reference:
MAC
pip install autopep8
Windows (PowerShell)
py -m install -–upgrade pip
py -m install -–upgrade autopep8
To save PEP8 compliant formatting changes when saving the file, be sure the check the box ‘Format On Save’ within the Autopep8 package settings.

Slàinte