Accuracy Setting Change in Ekahau AI Pro
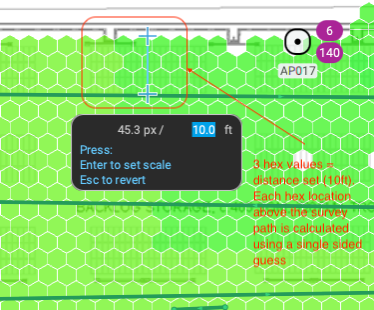
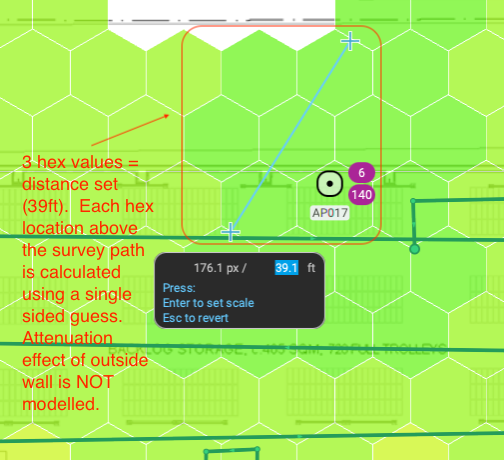
Previously, in Ekahau Pro, WLAN professionals had the ability to define how far from a measured point Ekahau could make an educated guess to generate a heat map. This distance was defined as an accuracy setting and could be selected as any one of the following values:
| Accuracy heatmap values | Accuracy distance (m) | Accuracy distance (ft) |
|---|---|---|
| Rough | 12 | 39 |
| Sketch | 8 | 26 |
| Accurate | 5 | 16 |
| Very | 3 | 10 |
| Super | 2 | 7 |
When viewing the ‘empty’ visualization, words are used while numbers are used when viewing ‘signal strength visualization. Units, in meters or feet, depend on the preference settings defined in File > Preferences… (Win) or Ekahau AI Pro > Preferences… (mac).
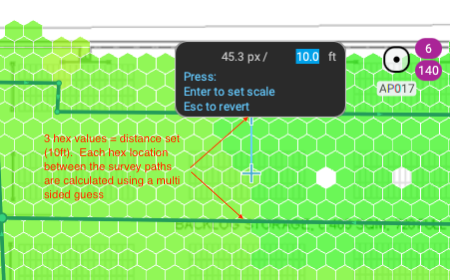
Setting larger distances permits Ekahau to calculate and display heatmap data further away from measured data points. In addition to measured data points, calculations are also derived using the map scale and FSPL. Locations surrounded by two or more measurement points are always more accurate (multi sided guess) compared to locations surrounded by a single measurement point (single sided guess).


With the release of Ekahau AI Pro (version 11+), accuracy values were relabelled as follows:
| Accuracy heatmap values | Accuracy distance (m) | Accuracy distance (ft) |
|---|---|---|
| Low | 12 | 39 |
| Fair | 8 | 26 |
| Normal | 5 | 16 |
| High | 3 | 10 |
| Max | 2 | 7 |
‘High’ is the default setting, while using ‘Max’ accuracy enables the reflection and diffraction engine. When this engine is enabled, AI Pro models simulated reflection and diffraction caused by various wall materials. There is a performance impact to enabling Max mode as there is a drastic increase in the number of calculations that must be performed to model these additional parameters.
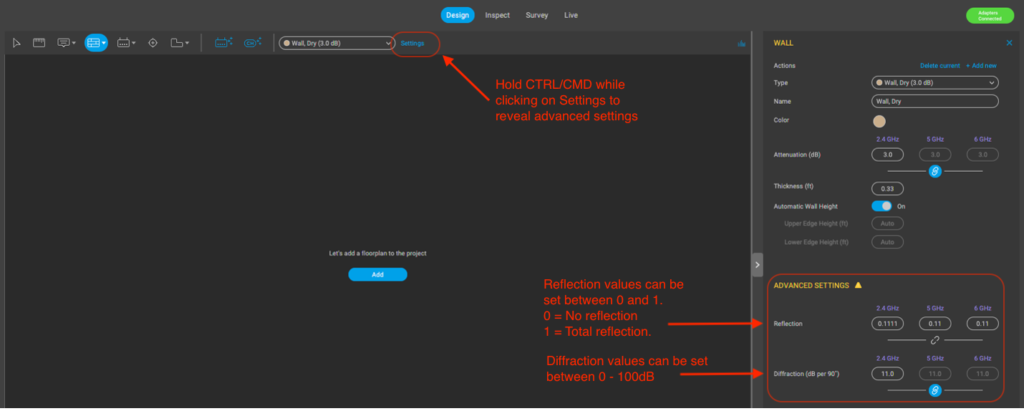
To view or modify reflection or diffraction settings, hold the CTRL/Command key while clicking on the ‘Settings’ button beside the wall dropdown menu.

Reflection values can be set between 0 and 1. 0 = No reflection, and 1 = Total reflection.
Diffraction values (dB per 90∞) can be set between 0 – 100dB.
Why does all this matter?
If you have been using the accuracy setting in your report templates, you will need to update those lovely templates to reflect the new accuracy values to generate the heatmaps desired in your reports.
Note – old templates will still run successfully without generating any errors, with accuracy defaulting to ‘High’. This may explain why some of the heat maps in your reports look different when generated using AI Pro.
Below is an example visualisation tag with an accuracy set to ‘normal’ as a reference for how accuracy is used in report templates.
<#{
  "visualization" : {
    "heatmap" : {
      "adapter" : "iPhone 14 Pro",
      "noise-floor-6Ghz-dBm" : "-95",
      "show-contours" : "true",
      "noise-floor-5Ghz-dBm" : "-95",
      "range-colors" : "#FF0000-#00F200",
      "range-abs-max" : "-45",
      "accuracy" : "normal",
      "type" : "sig-strength",
      "range-spacing" : "3",
      "requirement-grey-out" : "true",
      "signal-prediction" : "current-floor",
      "visualization-opacity" : "70",
      "range-cutout-min" : "-80",
      "filter" : {
        "include" : {
          "band" : "5"
        }
      },
      "mode" : "smooth",
      "sig-at-ch" : "all",
      "show-sig-of" : "strongest",
      "range-abs-min" : "-90",
      "noise-floor-2_4Ghz-dBm" : "-90",
      "noise" : "measured"
    }
  }
}#>
Slàinte!
Resources:
Latest Ekahau AI Pro Release notes:
https://sw.ekahau.com/download/pro/Release%20Notes.html
Download latest version of Ekahau AI Pro:
https://sw.ekahau.com/download/pro/
Template Reporting documentation from Ekahau
https://support.ekahau.com/hc/en-us/sections/115001529668
Classic accuracy parameters for the Heatmap documentation
https://support.ekahau.com/hc/en-us/articles/115005161607-Visualization-Tags
François Vergès