How to install and setup Nzyme on your WLANPi to create a WiFi network and security threat monitor
Nzyme: Turn Your Wi-Fi into a Super Sleuth (But Don’t Be a Nosy Neighbor)
Feeling like your Wi-Fi network is being infiltrated by shadowy figures? Well, fret no more! Nzyme is here to be your Wi-Fi’s very own Sherlock Holmes, sniffing out suspicious activity with the cunning of a bloodhound in a… well, a network full of data packets.
Nzyme is a network defense system than can monitor all Ethernet and Wi-Fi network traffic for threats, confirm expected behaviour and selectively forward data to your SIEM or log management system. This can all be done with minimal configuration and a small hardware footprint – like the WLANPi.

Nzyme’s Superpowers:
- WiFi Watchdog: Nzyme constantly monitors your wireless network, keeping an eye out for any rogue devices or funky business. Think of it as a guard dog, only instead of barking, it throws up an alert on your screen.
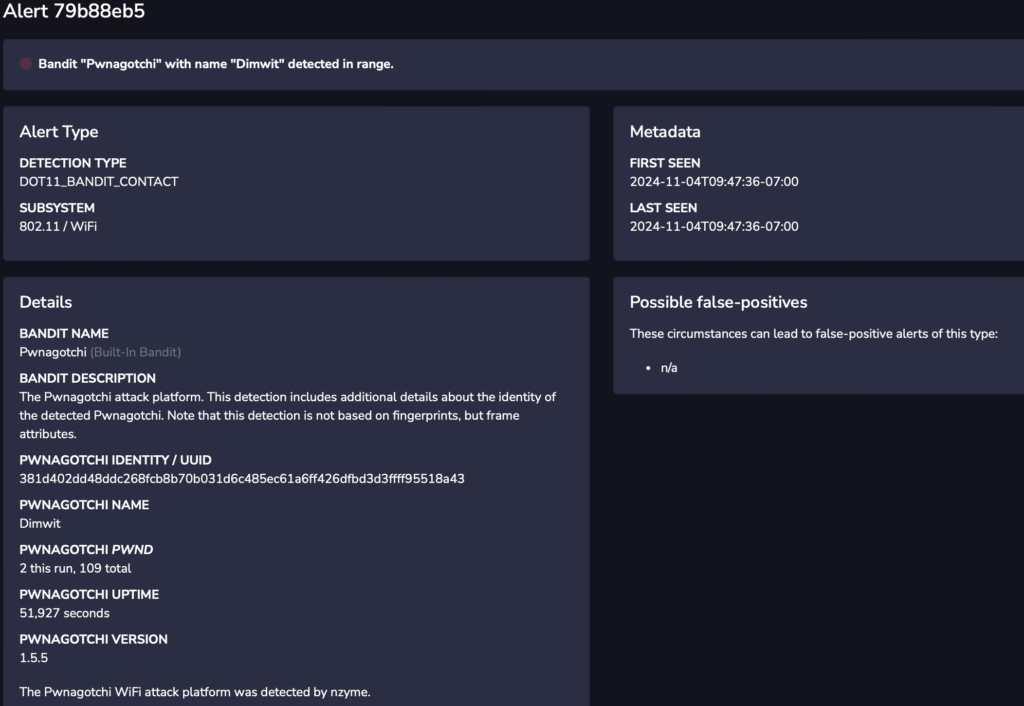
- Unmasking the Mystery Machines: Nzyme can identify known malicious devices like the nefarious “WiFi Pineapple” and the dastardly “Pwnagotchi.” It’s like having a rogue access point rolodex, so you know exactly who the bad guys are.
- Simple Setup, Superpower Activation: Nzyme is relatively easy to install and use, especially compared to tools that require you to speak fluent technobabble. No need to be a computer whiz to turn your Wi-Fi into a detective!

Nzyme’s Quirks:
- Not Exactly a Party Animal: Nzyme isn’t much fun for offensive hacking. It’s all about defense, which might be a snoozefest for those seeking digital thrills.
- Open Source Hiccups: Being open source means it’s free, but it also means that troubleshooting might require some detective work of your own.
- False Alarms? Nzyme can get a little overzealous sometimes, throwing up warnings for things that might not be actual threats. Just like an overprotective puppy, it might need some calming down, but this can easily be addressed with some training (configuration).
When to Call in the Nzyme Squad:
- Home Alone (But With Wi-Fi): Worried about someone leeching your Wi-Fi while you’re out there conquering the world (or, you know, grocery shopping)? Nzyme can be your home Wi-Fi’s watchful guardian.
- Office Wi-Fi Woes: Does your office Wi-Fi feel like the Wild West of internet connections? Nzyme can help identify any suspicious activity and keep your company network safe.
- Just Because You Can: Even if you suspect nothing, Nzyme can be a fun way to learn more about your Wi-Fi’s security and see what kind of devices are lurking around.
- Remote monitoring: Deploy a WLANPi as an nzyme-tap at remote locations to continuously monitor or access specific troubleshooting tasks.
How to Use Nzyme

Installation
We’re going to install Nzyme on a WLANPi, but this could be almost any Unix/Linux-based system. While installing Nzyme itself is relatively straightforward, we must be sure to install the necessary dependencies.
This guide assumes that you are installing from a fresh set up of the WLANPi image which uses Bullseye, as of the time of this writing. Additionally, we will be installing nzyme-node and nzyme-tap on the same WLANPi, however you could install nzyme-node on a more powerful system.
Install Dependencies
The following command checks for updates and installs Java 17 (OpenJDK) and PostgreSQL.
sudo apt update && sudo apt install -y openjdk-17-jre-headless postgresql-13Install nzyme-node
Download the latest nzyme-node Debian .DEB package from the downloads page. It does not need architecture-specific packages and there is only one.
Download and install the nzyme-node package for WLANPI – RaspberryPi (Bullseye):
wget [url_to_nzyme_deb_package]
sudo dpkg -i nzyme-node_rpios-11bullseye-noarch-x.x.x.deb
If upgrading nymze-node, use the following commands (order matters):
sudo systemctl stop nzyme
sudo apt install openjdk-17-jre-headless
sudo dpkg -i nzyme-node_x.x.x.deb
sudo apt purge openjdk-11-jre-headless
sudo systemctl daemon-reload
sudo systemctl start nzyme
If you are upgrading from a previous version of nzyme-tap, you can simply run dpkg -i on the new release package and restart the nzyme-tap service after adding the new required configuration. Check here for more details.
Initial nzyme-node Configuration:
Setup Postgresql (on device functioning as node) following the commands shown below:
sudo -u postgres psql
...
postgres=# CREATE DATABASE nzyme;
CREATE DATABASE
postgres=# CREATE USER nzyme WITH ENCRYPTED PASSWORD 'YOUR_PASSWORD_HERE';
CREATE ROLE
postgres=# GRANT ALL PRIVILEGES ON DATABASE nzyme TO nzyme;
GRANT
postgres=# \c nzyme
You are now connected to database “nzyme” as user “postgres”.
postgres=# GRANT CREATE ON SCHEMA public TO nzyme;
GRANT
postgres=# \q
The username and password set above will be used in the next step.
Configure nzyme.conf (on device functioning as node). Open the file /etc/nzyme/nzyme.conf and edit at least the following settings:
| Variable | |
| name | The name of this nzyme node. If you are unsure, leave it at the default value. |
| database_path | URL to the PostgreSQL database you set up above. Make sure the host, database name, username and password are correct. |
| rest_listen_uri | The URI that the REST API and web interface will listen on. Set this to a URL with an IP address you can reach from your workstation. The default is to listen on localhost only. You can set it to https://0.0.0.0:[port] to listen on all interfaces. |
| http_external_uri | The address your browser will use to connect to the REST API of this node. It’s likely the same as interfaces.rest_listen_uri when not running behind a load balancer or NAT. |
An example of the lines to edit is shown below. Replace the values in <> to match your local environment.
name: <nzyme-node-01>
database_path: “postgresql://localhost:5432/nzyme?user=nyzme&password=<YOUR_PASSWORD_HERE>
rest_listen_uri: “https://<NODE_IP_address>:22900/”
http_external_uri: “https://<NODE_IP_address>:22900/”
The last setting you have to confirm is in the /etc/default/nzyme file. You will find the following line in it:
NZYME_JAVA_OPTS="-Xms1g -Xmx1g -XX:-OmitStackTraceInFastThrow"Start Nzyme
You are now ready to enable Nzyme and configure the service to start up automatically at boot.
sudo systemctl enable nzyme
sudo systemctl start nzyme
To check on the status of the Nyzme service, type the following command.
sudo systemctl status nzymeOutput should appear similar to below:
parallels@ubuntu-linux-2404:~$ sudo systemctl status nzyme
[sudo] password for parallels:
● nzyme.service - Nzyme
     Loaded: loaded (/usr/lib/systemd/system/nzyme.service; enabled; preset: enabled)
     Active: active (running) since Sun 2024-11-03 08:13:00 MST; 10h ago
       Docs: https://github.com/lennartkoopmann/nzyme
   Main PID: 442934 (nzyme)
      Tasks: 55 (limit: 2206)
     Memory: 757.2M (peak: 1.1G swap: 570.2M swap peak: 786.6M)
Log into Node for 1st time
Once /var/log/nzyme/nzyme.log shows a line like this, you are ready to go:
[main] INFO app.nzyme.core.rest.server.NzymeHttpServer - Started web interface and REST APIYou can now open the nzyme web interface at the address you configured as http_external_uri above. Make sure to use https:// because Nzyme does not allow non-TLS HTTP. For example: https://<NODE_IP_ADDRESS>:22900/
At the initial login screen, create an admin user with email address that becomes username. Create a password of 12 – 80 characters in length. Add MFA (Google Authenticator or Authy). Back up the generated recovery code to a safe place.
Adding an Nzyme Tap (WLANPi)
Install nzyme-tap
wget [url_to_nzyme_deb_package]
sudo dpkg -i nzyme-tap_ubuntu-2404noble-amd64-x.x.x.deb
Configure nzyme-tap.conf (on device functioning as tap)
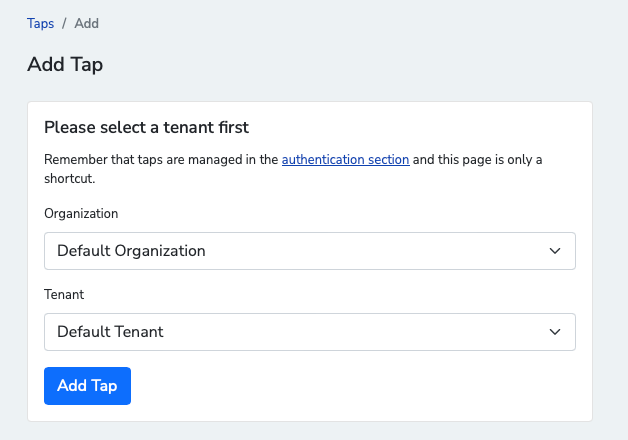
Create a Tap in the Node web interface by clicking System > Taps > Add Tap. Select Organization (Default) and Tenant(Default), then click Add Tap.
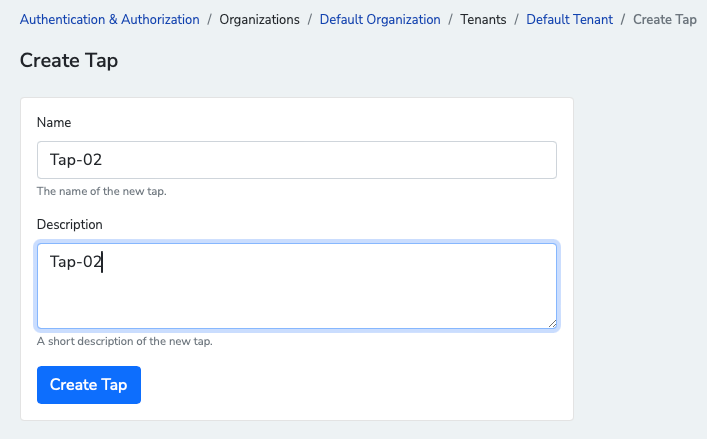
Add a name and description, then click Create Tap.
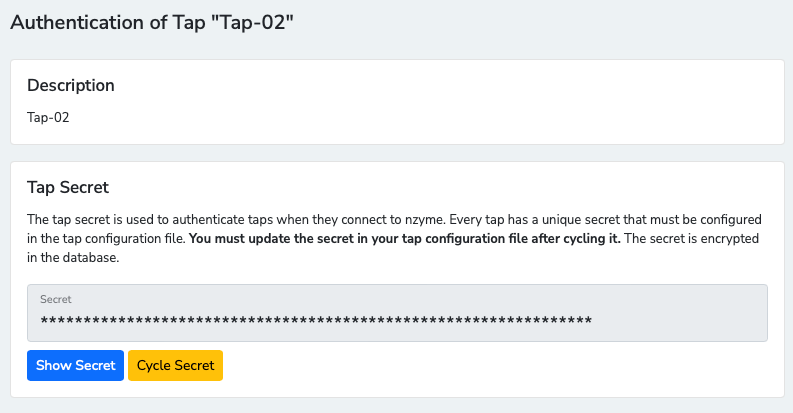
Click on the newly created Tap.

Copy the Tap Secret (to be set in nzyme-tap.conf).
Open the file /etc/nzyme/nzyme-tap.conf and edit at least the following settings:
| Variable | Description |
| leader_uri | The HTTPs address of your nzyme-node or load balancer |
| leader_secret | The leader secret for this tap, copied from the tap details page in the Nzyme web interface |
| accept_insecure_certs | Set to true or false. The default TLS certificate of nzyme-node is self-signed and considered insecure. Either set this to true and accept the risk or install your own TLS certificate. |
| channels_2g | 2.4GHz channels supported by WNIC. |
| channels_5g | 5GHz channels supported by WNIC. |
| channels_6g | 6GHz channels supported by WNIC. |
| ethernet_interfaces.* | Each block defines an Ethernet interface to listen on. For example, [ethernet_interfaces.eth0] would instruct the tap to record and process all packets seen on the interface enp6s0. Use quotes if the interface name has special characters in its name. |
| wifi_interfaces.* | Each block defines a WiFi interface to listen on. The tap will automatically configure it and set it into monitor mode. You can learn how to pick channels in the channel hopping documentation. Use quotes if the interface name has special characters in its name. |
The leader secret for this tap can be copied from the tap details page in the Nzyme web interface. It’s a good idea to balance the number of channels scanned equally across each WNIC so the time cycle through the channels is similar. In the example below, only the PSC channels on the 6 GHz band are included.
leader_secret = "your_key_copied_from_nzyme_web_interface"
accept_insecure_certs = true
[ethernet_interfaces.<eth0>]
[wifi_interfaces.wlan0]
channels_2g = [1, 6, 11]
channels_5g = [52, 56, 60, 64, 100, 104, 112, 116, 120, 124, 128, 132, 136, 140, 144]
channels_6g = []
[wifi_interfaces.wlan1]
channels_2g = [2, 3, 4, 5, 7, 8, 9, 10, 12, 13]
channels_5g = [36, 40, 44, 48, 149, 153, 157, 161, 165]
channels_6g = [5, 21, 37, 53, 69, 85, 101, 117, 133, 149, 165, 181, 197, 213, 229]
To see a list of channels supported by your WLANPi WNIC, enter the following two commands. First, list the all the wireless adapters:
wlanpi@wlanpi-foo:~ $ iw dev
phy#0
     Interface wlan0
         ifindex 4
         wdev 0x1
         addr a8:93:4a:e0:d5:1f
         type managed
         txpower 3.00 dBm
         multicast TXQ:
              qsz-byt  qsz-pkt  flows    drops    marks    overlmt  hashcol  tx-bytes tx-packets
              0    0    0    0    0    0    0    0        0
Copy the physical identifier (for example, phy#0) of the device you are interested in and use it with the iw phy command:
wlanpi@wlanpi-foo:~ $ iw phy phy0 channels
Band 1:
     * 2412 MHz [1]
       Maximum TX power: 20.0 dBm
       Channel widths: 20MHz HT40+
     * 2417 MHz [2]
       Maximum TX power: 20.0 dBm
       Channel widths: 20MHz HT40+
     * 2422 MHz [3]
       Maximum TX power: 20.0 dBm
       Channel widths: 20MHz HT40+
     * 2427 MHz [4]
       Maximum TX power: 20.0 dBm
       Channel widths: 20MHz HT40+
     * 2432 MHz [5]
       Maximum TX power: 20.0 dBm
       Channel widths: 20MHz HT40- HT40+
…
     * 7055 MHz [221] (disabled)
     * 7075 MHz [225] (disabled)
     * 7095 MHz [229] (disabled)
     * 7115 MHz [233] (disabled)
Start the Tap (on device functioning as tap)
sudo systemctl enable nzyme-tap
sudo systemctl start nzyme-tap
Check status of the tap:
sudo systemctl status nzyme-tapOutput should look similar to below:
wlanpi@wlanpi-foo:~ $ sudo systemctl status nzyme-tap
● nzyme-tap.service - Nzyme-Tap
     Loaded: loaded (/usr/lib/systemd/system/nzyme-tap.service; enabled; preset: enabled)
     Active: active (running) since Sun 2024-11-03 08:13:29 MST; 10h ago
       Docs: https://github.com/lennartkoopmann/nzyme
   Main PID: 443265 (nzyme-tap)
      Tasks: 22 (limit: 2206)
     Memory: 9.0M (peak: 22.8M swap: 20.1M swap peak: 22.1M)
        CPU: 4min 57.521s
If there are errors in the nzyme-tap.conf file, the tap will not startup correctly. Check for incorrect interface names (wired and wireless) and invalid Wi-Fi channel support.
Basic configuration of Nymze
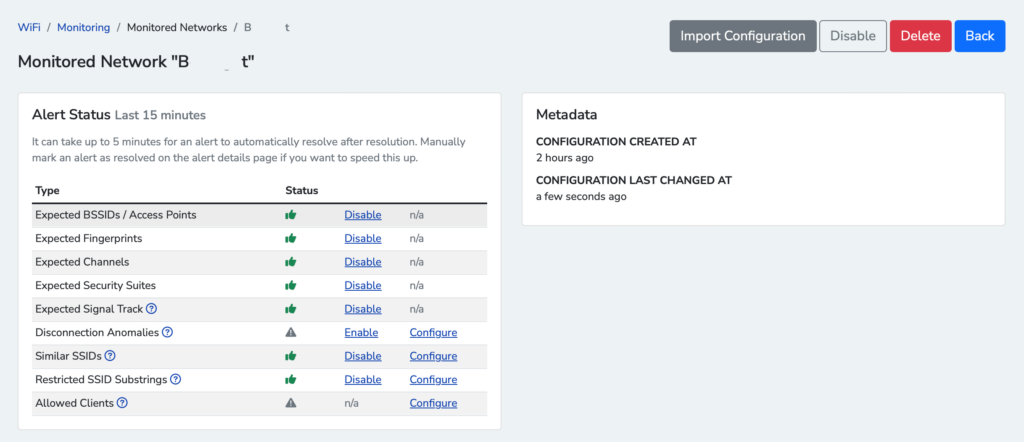
Select WiFi > Monitoring, then add an SSID. Once added, click on the SSID and enable/disable the alerts you are interested in. Finally, click Enable in the top right to start monitoring. Repeat for each SSID you would like to monitor.
List of Wi-Fi alerts that can be configured.
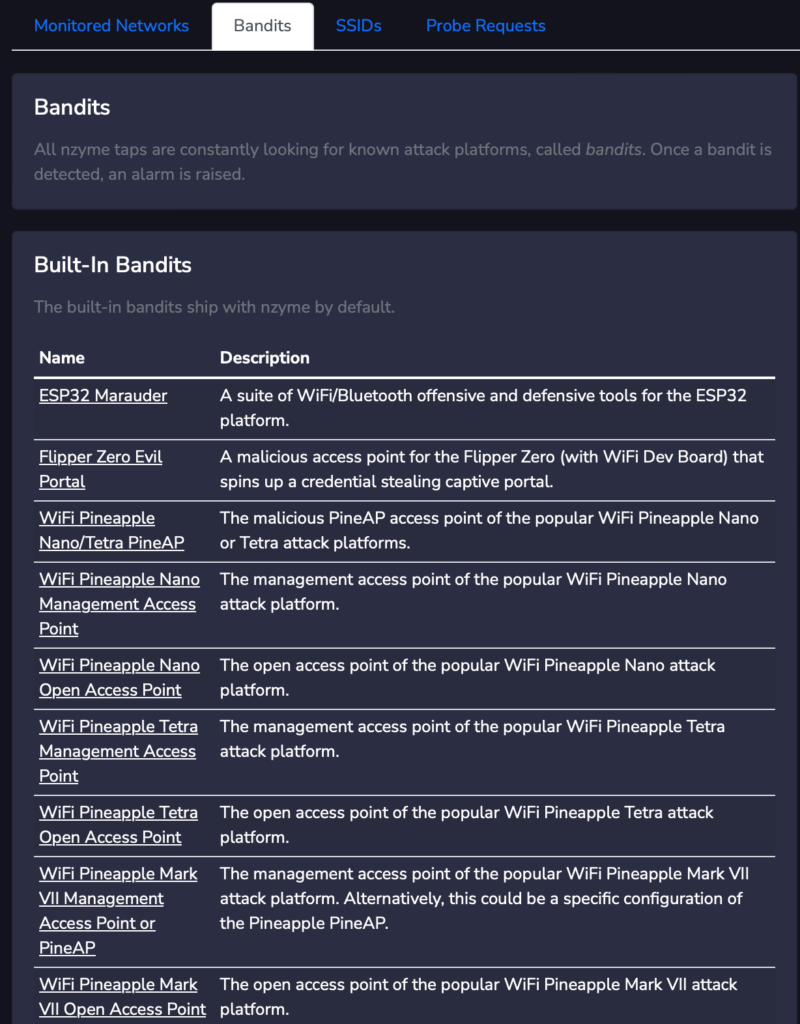
You can also look at the “Bandits” tab to see the built-in bandits that ship with Nzyme with an option to add your own custom bandits. Bandits act like fingerprints to detect changes to operation/configuration over time.
As for the nitty-gritty of configuring and running Nzyme, that’s a task best left to the internet spelunkers. There’s a labyrinth of commands and configurations involved, and trust us, you’ll want a digital compass (or a friendly techie) to guide you through. But hey, if you’re feeling adventurous, a quick web search for “Nzyme installation guide” might just turn you into a Wi-Fi security guru!
Remember, with Nzyme, knowledge is power. Use it to keep your Wi-Fi safe, but don’t forget, a little mystery is always more fun than a network full of nosy neighbors!
Slàinte!
Resources
Nzyme
Nzyme documentation
https://docs.nzyme.org/getting-started/installation/rpios-11
Nzyme Github