Extreme Private-PSK (PPSK)
This post provides an overview of the Private Pre-shared Key (PPSK) feature available in Extreme Networks’ access points connected to ExtremeIQ.
Explanations below provide greater detail with additional context and options for advanced configuration; however, it takes less than 5 minutes to configure a PPSK enabled SSID with three unique PPSKs to connect three different devices with their own unique PPSK.
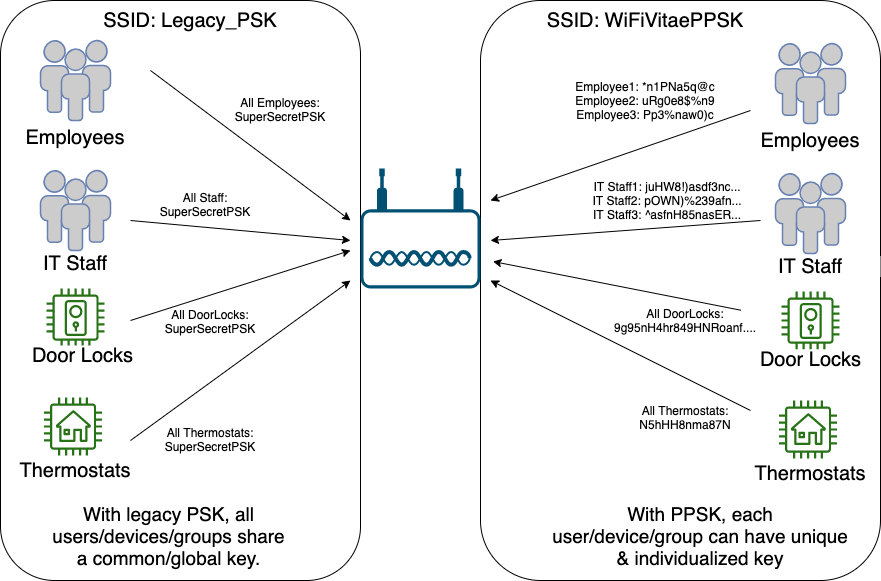
With traditional Pre-shared Keys (PSKs) a single global key is created; this single key is distributed to all stations connecting to the same SSID. If an administrator wanted to assign a different key to different groups of devices, an additional SSID must be created – one per SSID. Too many active SSIDs leads to beacon bloat – the needless consumption of airtime from beacon frames sent 10 times per second, per SSID, per radio.
Private Pre-Shared Keys (PPSK) allow administrators to assign different and unique keys to individual users and/or groups of devices. With PPSK, every user can have their own individual key; groups of IoT devices like thermostats, lights, 3D-printers, motion sensors, blinds, and register vents can also have their own group or individual key. PPSKs can be pre-created or generated on demand, via employees, guest portals, or kiosk stations. PPSKs can also be generated and managed using APIs.
A few highlights about Private PSK:
- PPSK allows multiple stations to associate with the same SSID, with each station assigned an individual and unique PPSK
- Reduce number of SSIDs by collapsing the number of advertised PSK-based SSIDs into a single PPSK-based SSID
- Link individual PPSKs to a username, which can be monitored and reported
- Delete or revoke individual PPSKs when users/devices no longer need to connect to the WLAN without having to distribute a new global key to all users/devices
- Unique usage and security policies can be created for each group of PPSKs
- PPSKs can be configured for unlimited use or limited to a maximum number of clients (0 – 15, 0 = unlimited)
- PPSKs can optionally be bound to a configured number of MAC addresses (1-5)
- PPSKs can be stored on the AP directly (limit 10,000 PPSKs) or in the cloud (unlimited)
- No need to change the PPSK for all users or device groups if a key is compromised
- PPSKs can be as complex or as simple as desired with respect to passphrase length and alphanumeric characters
- PPSKs can be generated manually by administrators/reception
The following is a step-by-step guide to setup your SSID with PPSKs.
The ExtremeIQ portal can be accessed via the following URL: https://extremecloudiq.com/login#/dashboard
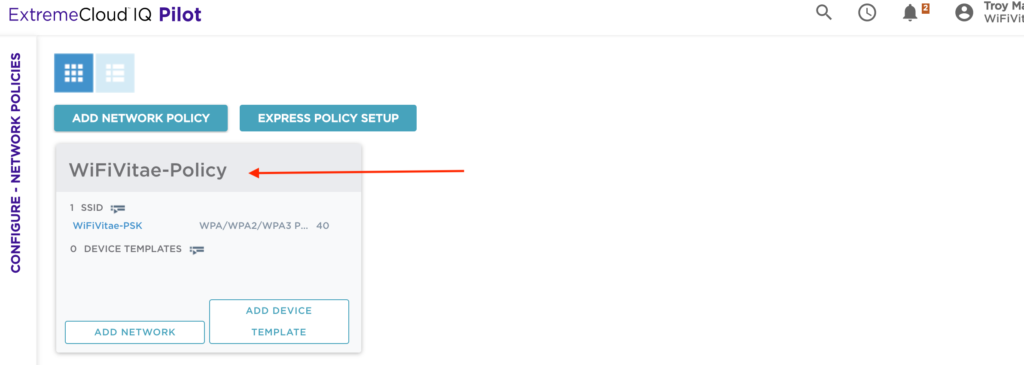
First, add a PPSK-based SSID to the existing Network Policy. Click on ‘configure’ and choose ‘Network Policies’ from the drop down.

To edit an existing Network Policy, click on the title of the existing Network Policy – ‘WiFiVitae-Policy’.
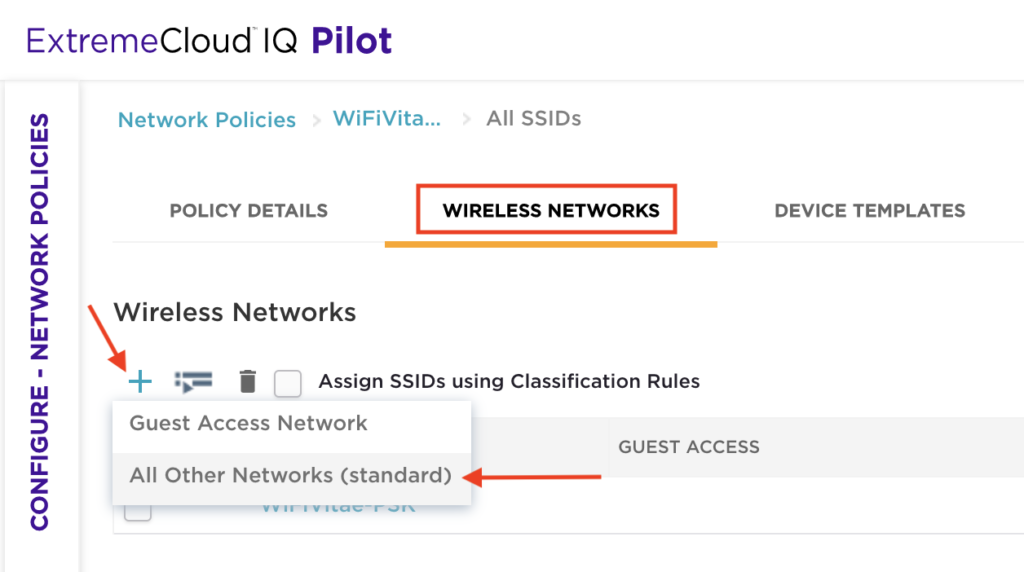
Click on the ‘Wireless Networks’ tab. Next click on the ‘+’, then select ‘All Other Networks (standard)’ to create a new SSID.
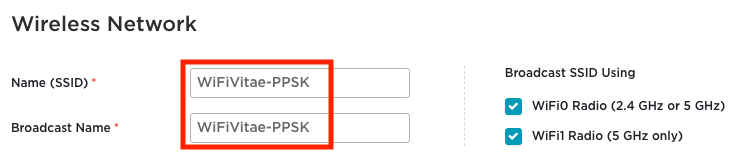
General SSID settings
On this screen, enter the SSID name in the ‘Name (SSID)’ field. ExtremeIQ automatically copies this name to the ‘Broadcast Name’ field in order to save you a few keystrokes, but the values do NOT have to be the same. Name (SSID) is the logical object name in ExtremeIQ, while the broadcast name is what is actually displayed on the air waves.
In the ‘SSID Usage’ section, ensure ‘Private Pre-Shared Key’ is selected, which should already be the default selection.
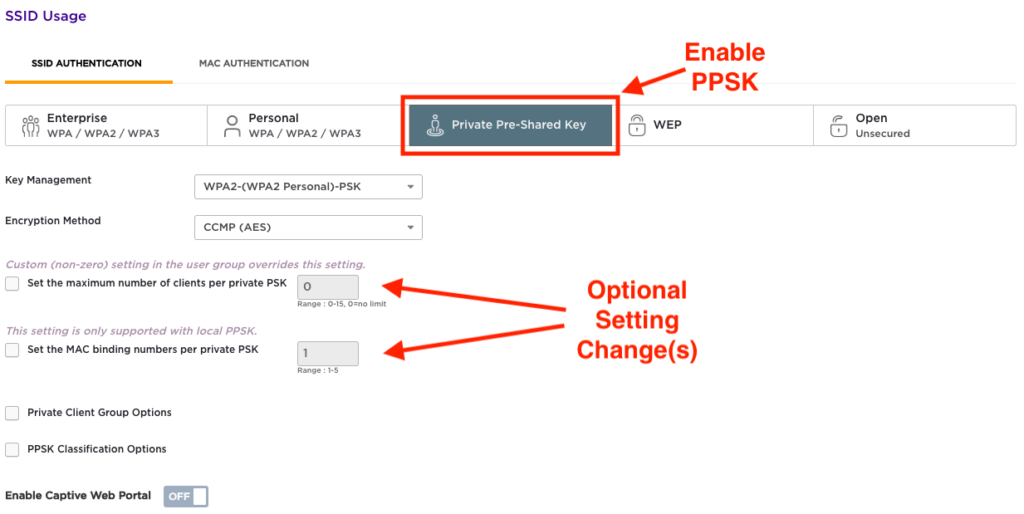
Optionally, limit the number of simultaneously connected devices per PPSK by checking the box below and setting a value between 0-15 (0 = no limit – default).
Also, optionally bind the PPSK to a specific number of MAC addresses (1-5). Note: this setting is ONLY supported using local PPSKs.
Furthermore, you could enable Private Client Group Options, but this feature goes beyond the intention of this article. Client groups are useful for advertising a single SSID in a residence building or MDU, while creating a private key and segmented access for residents within a given room, apartment, or condo unit.
User Access Settings
Under ‘User Access Settings’, create the required group types. This allows administrators to create differentiated access for various users and device types. In this example, a group is created for employees, IT, and IoT devices with the characteristics identified in the table below. Keep in mind the example below is intended for demonstrative purposes and NOT as best practice for robust security. Many PPSK options are available to best meet the capabilities of connecting clients.
| User Group | Password Policy | Description |
|---|---|---|
| employees | Characters: Letters, Numbers, Special Enforce: ANY selected character types Minimum PPSK Length: 20 | Unique PPSK assigned to each user allowing that user to connect unlimited number of devices with the same PPSK. |
| IT | Characters: Letters, Numbers, Special Enforce: ALL selected character types Minimum PPSK Length: 20 | Unique PPSK assigned to each user allowing that user to connect unlimited number of devices with the same PPSK. |
| IoT-Thermostats | Characters: Letters, Numbers Enforce: ALL selected character types Minimum PPSK Length: 12 | Unique PPSK assigned to group of IoT devices. All models within that type will use the same PPSK. One PPSK for all thermostats and another PPSK for all door locks. |
| IoT-DoorLocks | Characters: Letters, Numbers Enforce: ALL selected character types Minimum PPSK Length: 63 | Unique PPSK assigned to group of IoT devices. All models within that type will use the same PPSK. One PPSK for all thermostats and another PPSK for all door locks. |
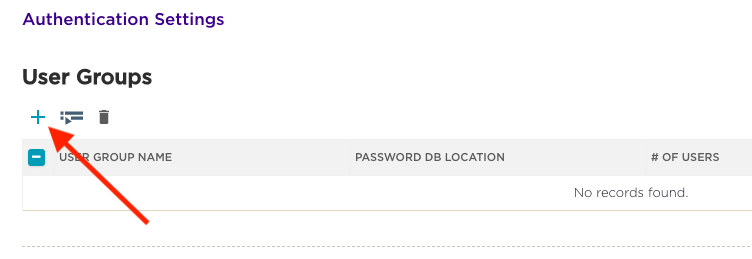
Check the box beside ‘Apply a different user profile to various clients and user groups’. Click the ‘+’ to create a new user group.
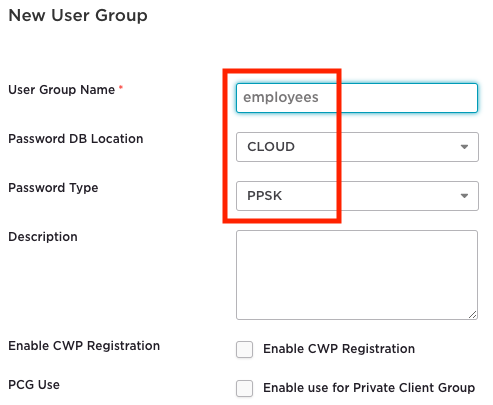
Enter the ‘User Group Name’: ‘employees’.
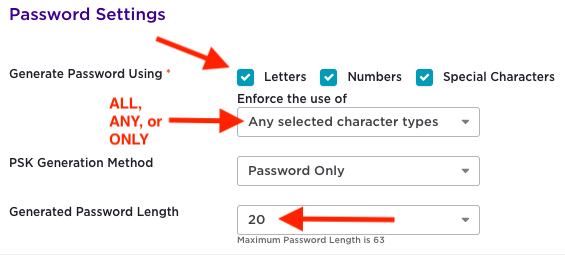
Check the valid character types permitted for use within the PPSK group.
Choose whether ALL, ANY, or ONLY one of the character types can be used.
Set the minimum password length: 20.
Both the IEEE and WFA recommend a minimum password length of 20 characters.
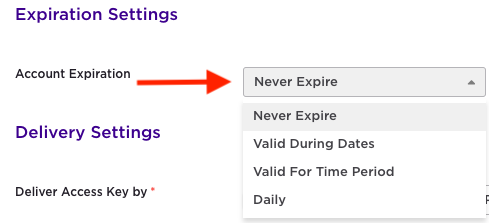
Leave the PPSK expiration set to ‘Never Expire’. Optionally, the PPSK could be set to expire at various intervals as shown below:
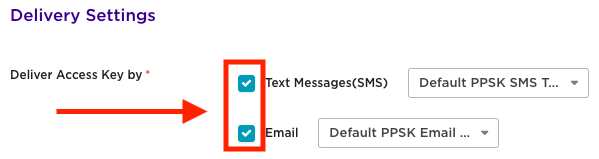
Select both SMS and Email delivery for the user-based PPSKs. If SMS and/or Email fields are populated when creating the users, PPSKs will be delivered to the users via these formats. Default templates are used, but Administrators may modify text and images sent within the SMS or email messages.
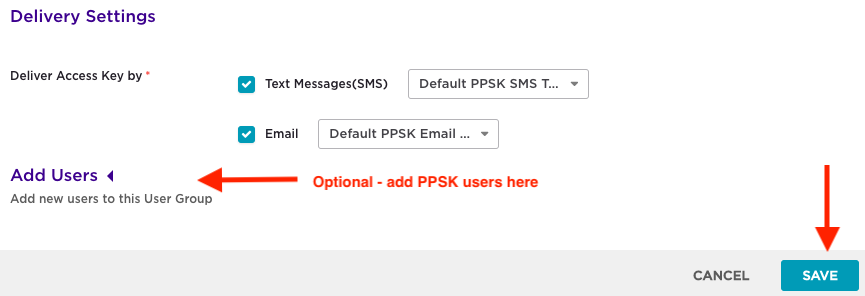
Optionally, add users to this group in the ‘Add Users’ section, however we are going to save that task for later and show where to access the users and user groups list within the ExtremeIQ portal. Once all settings have been applied, click on the ‘Save’ button at the bottom, which returns us to the SSID configuration screen.
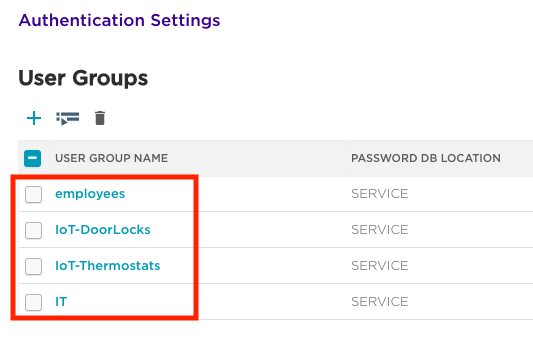
Repeat this process to create the additional required User Access Groups (IT, IoT-Thermostats, and IoT_DoorLocks). When ‘Password DB location’ is set to ‘Service’, the PPSK database is stored in the cloud, rather than locally on the APs. Once complete, ‘User Access Settings’ should look similar to below:
User Access Settings
A User Profile represents a profile for a logical group of users or devices. In an Enterprise environment, for example, a separate group could be created for different teams including: Sales, Finance, Marketing, Engineering, and Executive. Alternatively, a school could be broken down into the following User Groups: Staff, Students, Administration, and Building Maintenance. Administrators could also configure the User Groups such that each staff and student received a unique key, while groups of IoT devices used a common shared key – a single key for all thermostats, another for all wireless clocks, and yet another for all 3D-printers.
Now we must create the ‘User Profiles’ for each user/device category. ‘User Profiles’ allow administrators to assign group specific policies such as Layer 2 & 3 firewall rules, traffic tunneling, QoS, Time of Day access, client SLAs, and data/time limits. The example below will not go into details of setting all of these values and but will demonstrate creating a simple ‘User Profile’.
| User Profile | VLAN | User Group | Security |
|---|---|---|---|
| employee | 101 | employees | ACL restricting access to the management and IoT VLANs. |
| IT | 101 | IT | Full access. |
| IoT-Thermostats | 301 | IoT-Thermostats | Access only to IoT specific VLAN and limited Internet for cloud management of specific IoT device. |
| IoT-DoorLocks | 302 | IoT-DoorLocks | Access only to IoT specific VLAN and limited Internet for cloud management of specific IoT device. |
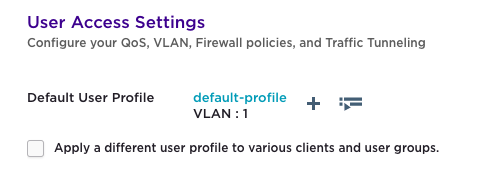
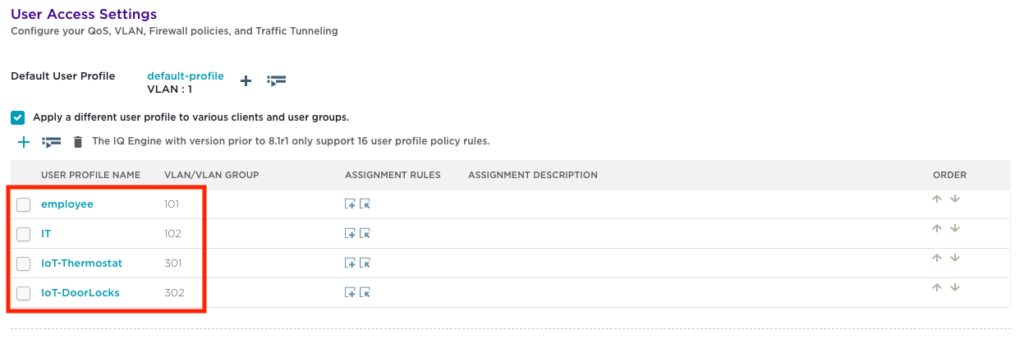
Initially unconfigured, the ‘User Access Settings’ section looks similar to below:
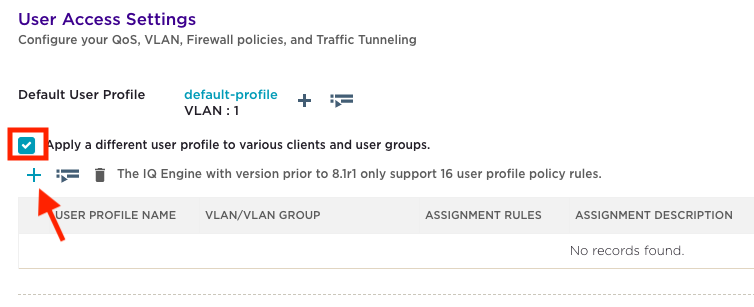
Check the box beside ‘Apply a different user profile to various clients and user groups.’ This will expand the section below allowing the creation of multiple user profiles. To create the first profile, click on the ‘+’ button.
Enter ‘User Profile Name’: employee and bind user profile to a VLAN. Select an existing VLAN from drop down or create a new VLAN by clicking on the ‘+’.
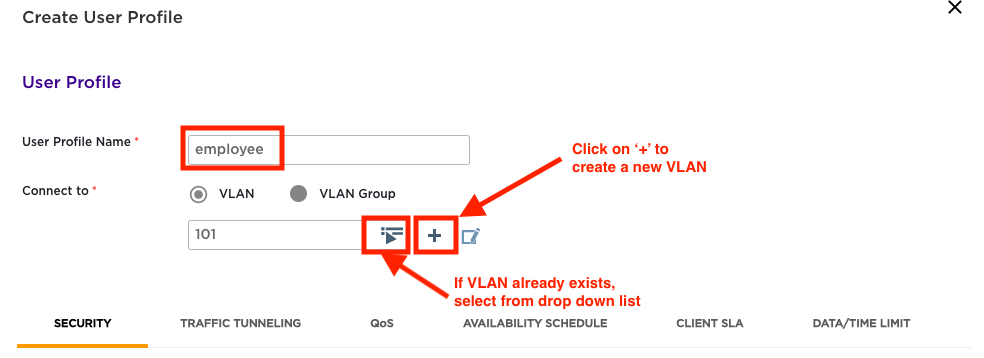
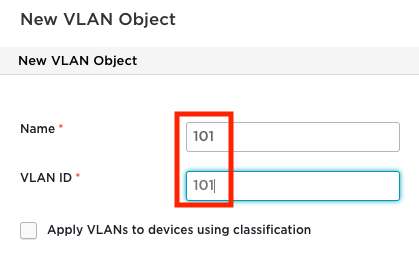
If creating a new VLAN, enter an object name and a VLANID number in the VLAN creation window.
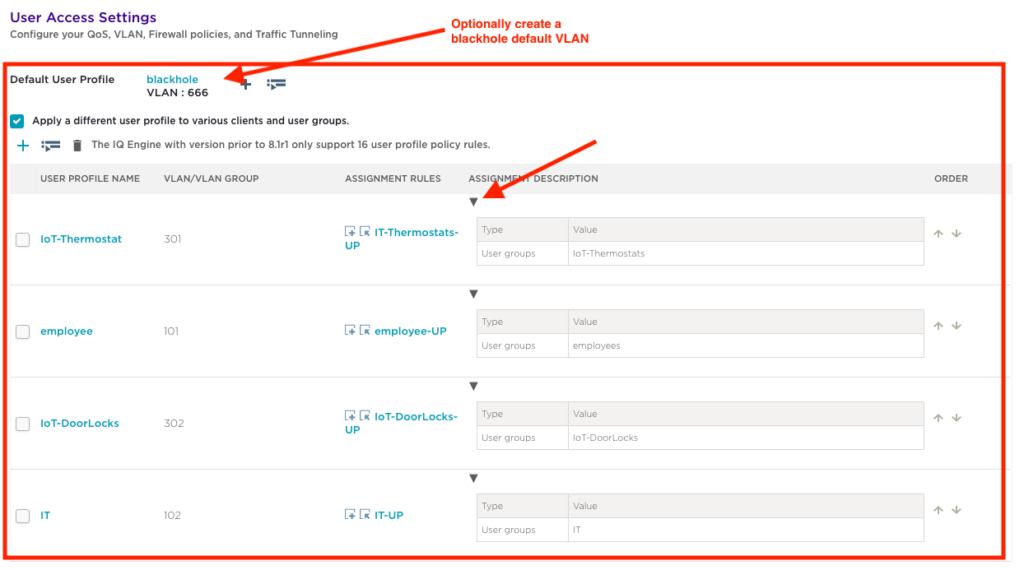
Repeat this process until all of the required User Profiles have been created. Once complete, User Access Settings should look similar to below.
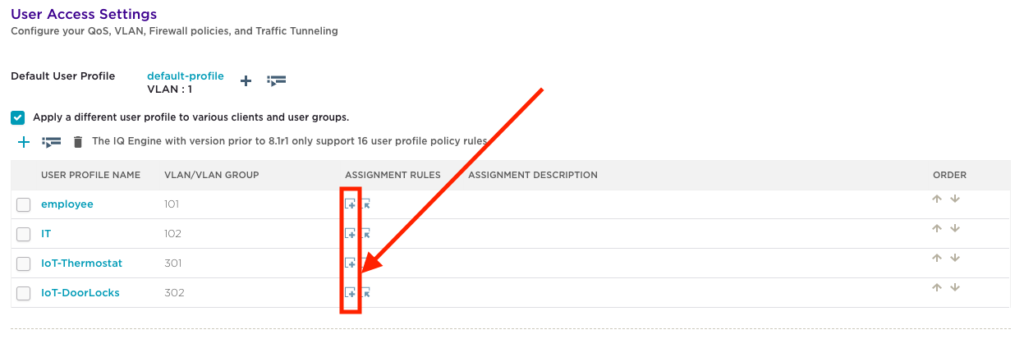
User Profile Assignment Rules
Assignment rules are used to link each ‘User Profile to a ‘PPSK User Group’. To configure this, click on the ‘Add a user profile assignment rule’ button to create a new assignment rule. Each User Profile needs to be linked to a ‘PPSK User Group’.
Enter ‘employee-UP’ as the name for the ‘User Profile Assignment’. Next, click on the ‘+’ to map this ‘User Profile’ assignment to a ‘PPSK User Group’ previously created for ‘employees’.
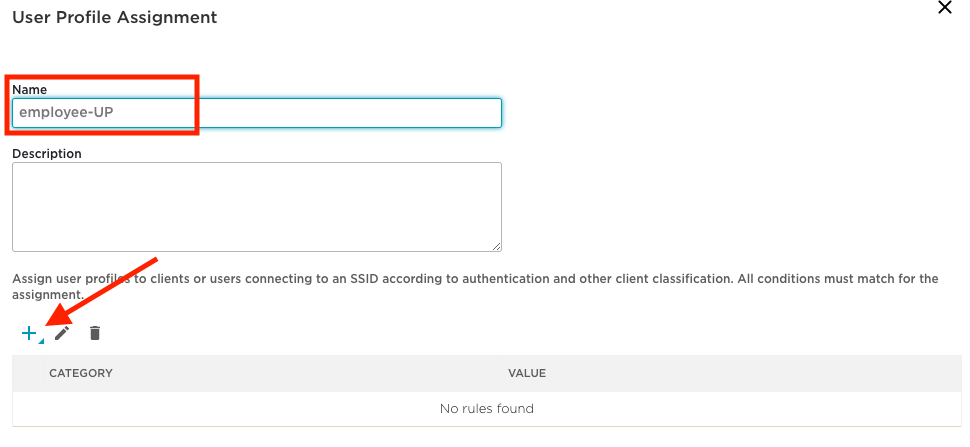
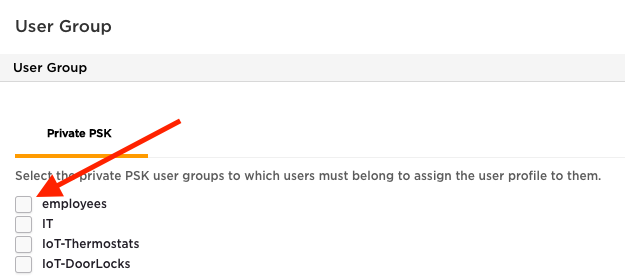
Select ‘User Group’ from the drop down.
Repeat this sequence until all ‘User Profiles’ have been mapped to an assignment rule. Once complete, this section should look similar to below. You can expand the assignment description by clicking on the black arrow to expand the display. Administrators may also create an optional default VLAN that acts as a catch all VLAN and blackholes any traffic not specifically matching a User Profile. The default VLAN acts as the catch all or any user or device not matching one of the specifically configured groups. The default VLAN should provide the most restrictive or limited access.
Generate User/Device PPSKs
As the final step, we must generate the actual PPSKs that will be used by each user/device. As mentioned earlier, this could have been done while creating the ‘User Group’. Users can also be manually created from the User configuration section as shown below:
Click on the ‘Settings’ icon to expand the Configuration options.
Click on ‘Users’ icon to expand the User Configuration options.
Click on ‘Users’ icon to expand the User Specific Configuration options.
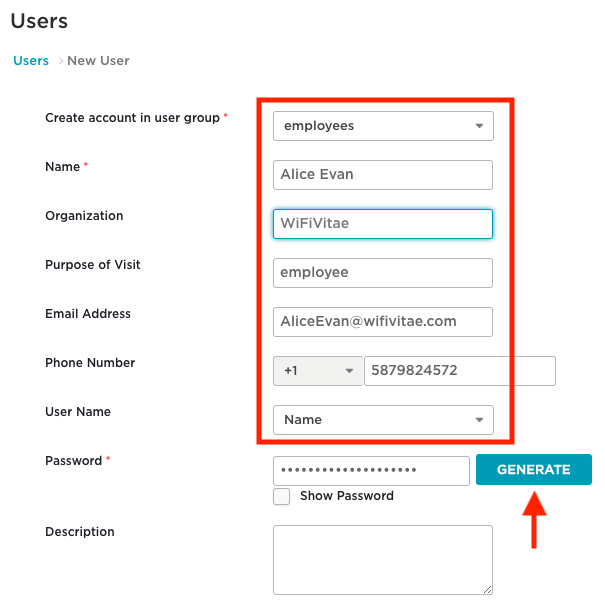
Click on the ‘+’ to create a new User.

Select the previously created ‘employees‘ User Group from the drop down list.
Enter a value for the name: ‘Alice Evans’.
Optionally, define the organization.
Optionally, define the purpose of the visit.
Enter the email address: AliceEvans@wifivitae.com.
Enter the SMS number: 15879824572.
Define how the user will be identified in the reporting tool – options include:
- Name field (default)
- Email address
- Phone Number
- Other
Click on the ‘GENERATE’ button to automatically create a PPSK based on the ‘PPSK User Group’ profile created previously (length, password complexity, and validity). Individual PPSKs can be revealed by checking the ‘Show Password’ box.
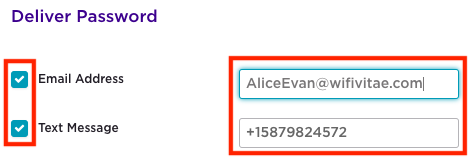
Next, define how this PPSK will be delivered. Note, the email and/or SMS do not have to be same as defined above in the user specific profile.
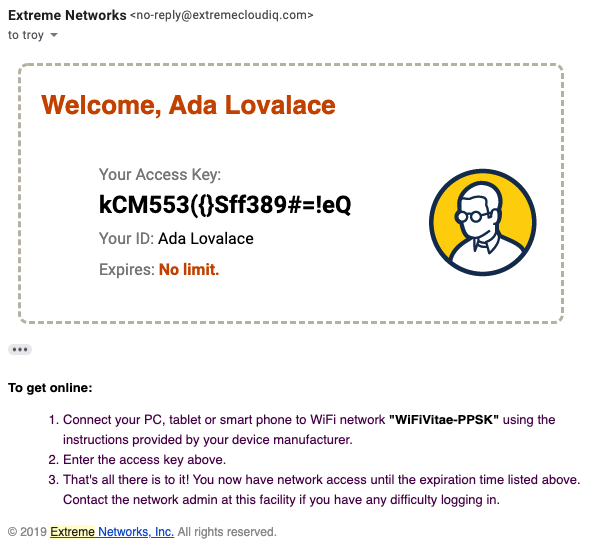
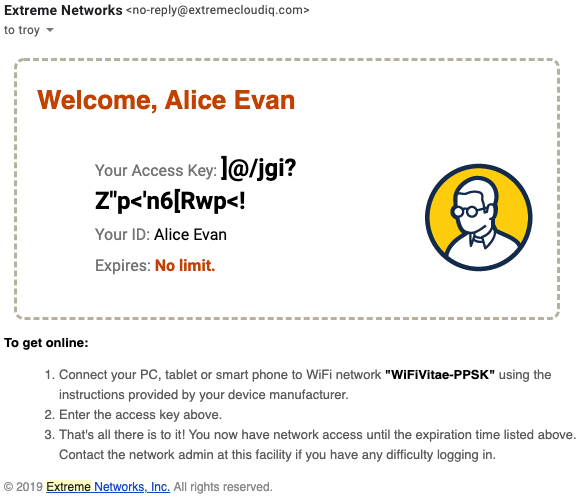
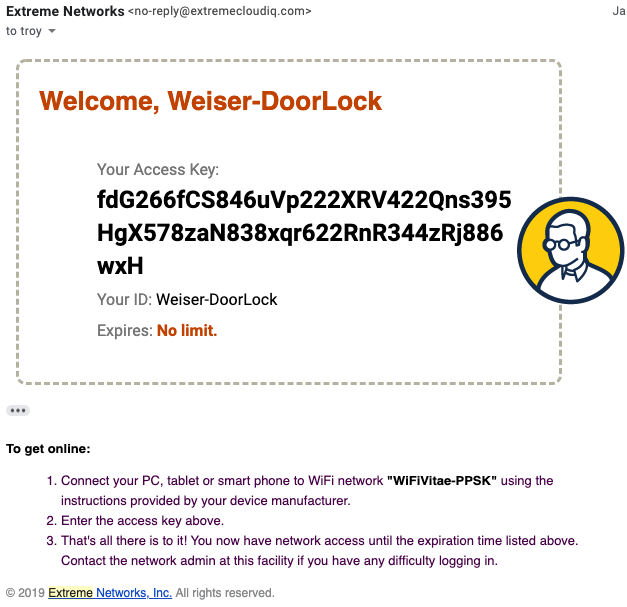
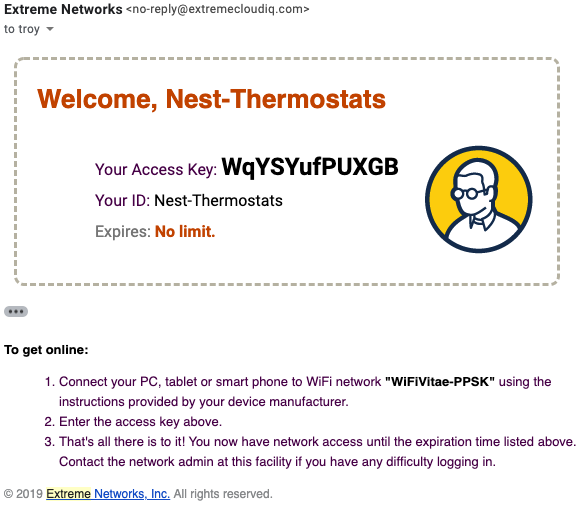
Example Delivery Messages
The following are examples of the default template email messages generated for each of the different PPSK User Groups confirming their specific password complexity and duration parameters.
User/Device Monitoring and Reporting
Once devices are connected to the SSID, administrators can head over the Client Monitoring page on the ExtremeIQ dashboard, where they can see devices connected to this SSID. Not only can administrators see the devices connected status, but it also shows their device type, VLAN, and User Profile.

That’s all it takes to quickly setup a PPSK-based SSID within the ExtremeIQ portal and push the configuration out the access points.
This is an incredibly useful and powerful feature to easily connect non-domain (guest or BYOD) devices or miscellaneous IoT devices with no support for certificates or limited passphrase support for PSK length and character types.
Keep in mind, this was just an example of how an administrator could manually configure PPSKs for a given SSID. APIs allow integration and automation of this process. Some 3rd party integrators such as Wiflex allow for easy on-boarding and PPSK generation for employees, BYOD, and visitors via easy to create on-boarding portals and kiosk terminals. A future blog will demonstrate the ease of this integration.
I hope you enjoyed this blog. If you have your own ExtremeIQ AP at home or use it currently in your production network, I highly encourage setting up a PPSK based SSID to provide differentiated access. Let me know your feedback!
Slàinte!