Extreme/Aerohive Configuration for Visitor On-Boarding with WiFlex
The idea here is to create an on-boarding SSID used to distribute keys or profiles easily and quickly to visitors arriving at your site. Once generated, the key itself is a passphrase which can be entered when connecting to a WPA2-Personal based SSID. Alternatively, a QR code can be generated and scanned to seamlessly load the profile with SSID name and PSK onto a visitor’s device. The PSK can also be delivered via email or SMS to the visitor based on details entered by the visitor during the on-boarding process. The PSK can also be printed on a separate page or visitor badge and handed to the visitor. Lastly, an operator or admin staff member can bulk add visitors to the WiFlex portal which will trigger the bulk creation of a PPSK for each visitor in the event a large group is expected to arrive on-site at the same time.
WiFlex provides a flexible Wi-Fi cloud on-boarding solution for your visitors, guests, or employees without the need of a RADIUS server or certificates. Everyone can get online fast and secure without the need for a complex and costly identity solution.
At a high level the following configuration tasks are required:
- Generate API tokens allowing authentication between ExtremeCloudIQ and WiFlex
- Enter Wi-Fi integration parameters in WiFlex portal
- Create an PPSK (Private PSK) based SSID (via SSID profile) in ExtremeCloudIQ where visitors will ultimately connect
- Create a separate open SSID (via SSID profile) in ExtremeCloudIQ for key creation via a captive portal

Generate API tokens and Integrate ExtremeCloudIQ with WiFlex
First of all, you need to integrate ExtremeCloudIQ with WiFlex enabling APIs to intercommunicate and exchange information between both cloud platforms.
To start this process, you need to retrieve the unique VIQ ID from ExtremeCloudIQ. If you manage multiple deployments, each deployment will have a unique VIQ ID. Log into you ExtremeCloudIQ dashboard at https://extremecloudiq.com/login#/login.
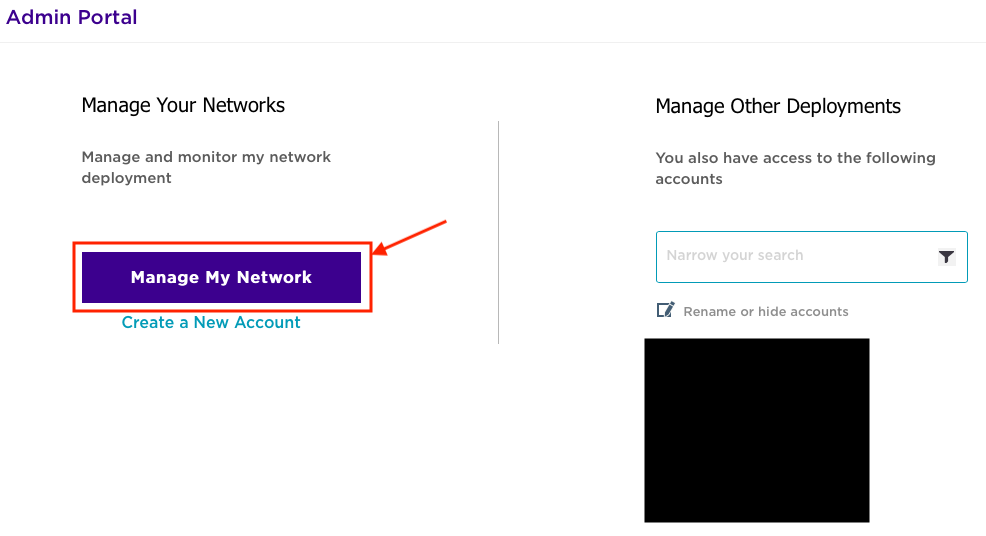
Choose the appropriate deployment. In this case, I selected “Manage My Account”.
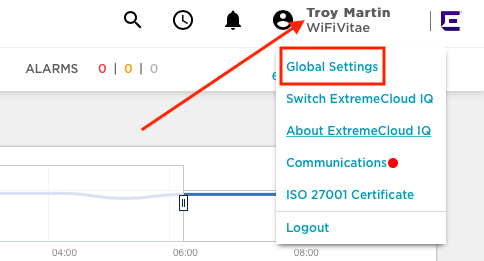
In the upper right-hand corner, click on your ExtremeCloudIQ username and select “About Extreme Cloud IQ”.

Copy the VIQ ID (5-digit value). You’ll need this to populate the ownerID field in the WiFlex portal:

The next step is to generate access and refresh tokens. WiFlex will use these tokens to access the ExtremeCloudIQ API, which will in turn authenticate and authorize WiFlex to issue API calls to create and retrieve PPSKs from ExtremeCloudIQ.
Access the WiFlex portal at https://portal.wiflex.eu/admin/login.php:
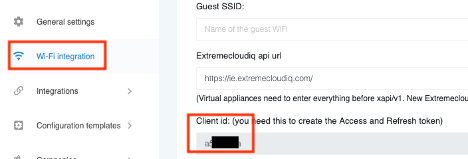
To retrieve the WiFlex ClientID, click on “Wi-Fi Integration” and scroll down to ClientID. This should be an 8-alphanumeric character value:
With the WiFlex ClientID, return to ExtremeCloudIQ. In the upper right-hand corner, click on your ExtremeCloudIQ username and then select “Global Settings”:
Within the API section, click on “API Token Management” and then click on the “+” to create a new API Access Token.

Paste the ClientID (copied from WiFlex) in the ClientID field and click on the generate button. Note: Clicking on “Expiration Settings” allows you to customize the lifetime of the token keys you are about the generate. Options include 30 days, defined number of days/months/years, or defined date. By default, tokens will expire 30 days after generation.

Close the window that pops up allowing you to copy the token. Select the appropriate token from the list of tokens in your cloud portal and copy the ‘access token’ and ‘refresh token’ so you can paste those values in their respective fields in the WiFlex portal.

Enter Integration Parameters in WiFlex
Return to the WiFlex portal, click on ‘Wi-Fi Integration’ and enter the following fields:
Configuration template: Select appropriate template (Default: main)
WiFi Vendor: Extreme Networks (Aerohive)
Guest SSID: WiFiVitae-PPSK (SSID name of PPSK-based SSID)
ExtremeCloudIQ API URL: Find this by looking at your ExtremeCloudIQ URL. It should be in the format https://[cloud server code].extremecloudiq.com. Ignore everything after this.

OwnerID: Enter your VIQ ID from ExtremeCloudIQ
Access Token: Paste in the ‘access token’ you generated earlier
Refresh Token: Paste in the ‘refresh token’ you generated earlier
Default group linked to the PPSK: WiFiVitae_Guest_WiFlex (This drop-down list is populated once API tokens have been saved. You may need to click on submit for this list to update via API calls).
Click on the ‘Submit’ button after fields have been modified.

Create PPSK-based SSID within ExtremeCloudIQ
This is the SSID to which visitors will ultimately connect their devices. Leveraging Extreme’s PPSK (Private PSK) technology, many users/devices can connect to the same SSID using different PSKs. Individuals or devices can each be assigned a unique PSK. In addition, groups of devices can share a common key – such as all 3D-printers use one PPSK, while all Wi-Fi enabled clocks use another PPSK.
I have already detailed how to configure a PPSK-based SSID in ExtremeCloudIQ in a previous post which can be found here – Extreme Private-PSK (PPSK). What I will show below is how to expand that same WLAN profile to include a ‘user group’ and ‘user profile’ for the visitors to connect once they receive a PPSK as described in the following section.
To do this, navigate to the ‘WiFiVitae-PPSK’ WLAN profile. Click on ‘configure’ and choose ‘Network Policies’ from the drop-down list.

To edit an existing Network Policy, click on the title of the existing Network Policy – ‘WiFiVitae-Policy’.

Click on the ‘Wireless Networks’ tab. Click on the ‘Wi-FiVitae-PPSK’ SSID.

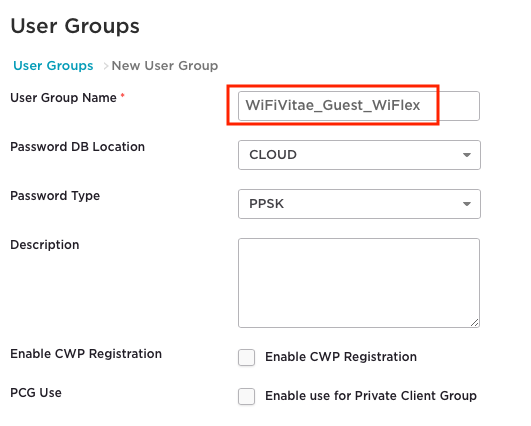
Scroll down to the ‘User Group’ section and click on the “+” to create a new visitor ‘User Group’.

We are going keep the user group very simple by adding only the group name of ‘WifiVitae-Guest_WiFlex’, but this is where you can configure PPSK attributes such as minimum character length, complexity (mix of letters, numbers, and special characters), and expiration. Click the ‘Save’ button at the bottom to save the user group.
Next move down to the ‘User Access Settings’ section and click the “+” to create a new user profile.

Enter ‘WiFiFlex-Visitor’ for the User Profile Name and select an appropriate VLAN for visitors. You can also configure L2-7 firewall rules specific to visitors mapped to this user profile which will be enforced by the AP at the edge of your network. Click ‘Save User Profile’ at the bottom to save this user profile.

Next, we need to assign the ‘user profile’ just created to the ‘user group’ previously created. To accomplish this, click “+” to create an assignment rule.

Enter a name of ‘WiFlex-UP’ for the ‘User Profile Assignment’ and click on the “+” button to link this assignment profile to a user group:

Select the ‘Cloud’ tab (PPSK are stored in the cloud as opposed to locally on the AP) and search for the user group ‘WiFiVitae_Guest_WiFlex’ previously created. Check the box beside this user group and click on the ‘Select’ button at the bottom.

Once complete the ‘User Access Settings’ should appear similar to below. Click on the ‘Save‘ button at the bottom to save your changes to the WLAN profile.

Create a guest WLAN within ExtremeCloudIQ
To do this, add a Guest SSID to the existing Network Policy. Click on ‘configure’ and choose ‘Network Policies’ from the drop-down list.
To edit an existing Network Policy, click on the title of the existing Network Policy – ‘WiFiVitae-Policy’. If a Network Policy does NOT exist, you will need to create one before moving to the next step.
Click on the ‘Wireless Networks’ tab. Click on the ‘+’, then select ‘All Other Networks (standard)’ to create a new SSID.

On this screen, enter the SSID name (i.e. “WiFiVitae-Guest”) in the ‘Name (SSID)’ field. ExtremeIQ automatically copies this name to the ‘Broadcast Name’ field in order to save you a few keystrokes, but the values do NOT have to be the same. Name (SSID) is the logical object name in ExtremeIQ, while the broadcast name is what is actually displayed on the air waves.

Continue to the ‘SSID Usage’ section and make the following changes:
- SSID authentication: Open (unsecured)
- Enable Captive Web Portal: On
- Select ‘Captive Web portal’
- Enable the feature: ‘User Auth on Captive Web Portal’ (All other features are disabled)
- Authentication Type: Choose ‘Redirection to External URL for Authentication’
Add a default web portal by clicking on the ‘Add’ button.

Enter a name for the Captive Web Portal Profile (e.g. “CWP-WiFlex”):

Create a “fake” RADIUS server. You are not actually going to use any RADIUS authentication so the values themselves don’t fully matter, but we don’t want users to be able to access network resources on this WLAN. Successful RADIUS logins are not required, but the RADIUS object must be configured on this WLAN profile.
Click on the “+” sign to create a new ‘Default RADIUS Server Group’ (RSG):

Click on the “+” sign to create a new ‘Default RADIUS Server Group’ (RSG) and enter a name (e.g. “RSG_WiFlex_FakeRADIUS”):

Under ‘External RADIUS Server’ (ERS), click on the “+” and enter a name (e.g. “ERS_WiFlex_FakeRADIUS”):

Select an existing IP/Hostname or create a new IP/Hostname profile by clicking on the “+” to create a new IP/Hostname. (e.g. “10.250.250.250”). Click on ‘Save IP Object” once all required fields have been populated. Remember, this is a “fake” IP address:

Enter some text in the ‘shared secret’ field and then click on ‘Save External RADIUS’ button:

Check the box beside your configured RADIUS server. Click on ‘Save RADIUS’ to save the RADIUS server profile.

Your Authentication settings should appear similar to what is shown below:

Create a default user under the ‘User Access Settings’ by clicking on the “+” button.

User profiles can be used to define: VLANS, L2/L3 Firewall rules, QoS, Time of Day (ToD) availability, and data/time limits applied to a group of users. Keep the configuration simple for now and just define the VLAN for guest users by creating a user profile called ‘WiFiVitae_Guest_DefaultUP’ on VLAN 40. To save the profile, click on ‘Save User Profile’. The VLAN should allow visitor devices to request an IP address via DHCP and access the WiFlex portal over the Internet:
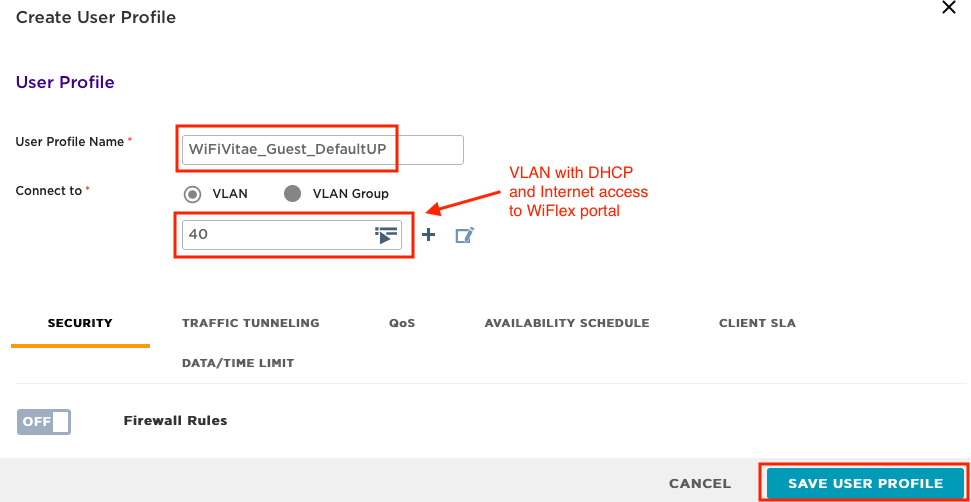
Click on ‘Save’ to save the Guest User Profile.
Click on ‘Save’ to save the Guest SSID Profile.
Scaling – Adjusting Credential Distribution Groups
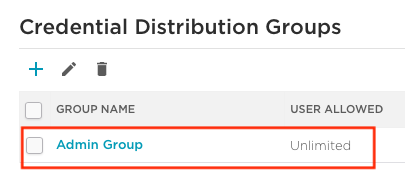
You also need to change the default limit of 20 for the number of passwords that can be created by the Admin Credential Distribution Group.
In the upper right-hand corner, click on your ExtremeCloudIQ username and select “Global Settings”.
Under ‘Accounts’, click on ‘Credential Distribution Groups’, and then click on the ‘Admin Group’.

Uncheck the box labelled ‘Credential Restriction’ to set this to unlimited.

Once the change has been made, your settings should appear similar to below with ‘user allowed’ displayed as ‘unlimited’:
All that is left is to push the configuration out to your access points. I recommend a complete update (full configuration push and mandatory AP reboot) for these changes. You can try a delta update, but if functional testing fails, attempt a complete update.
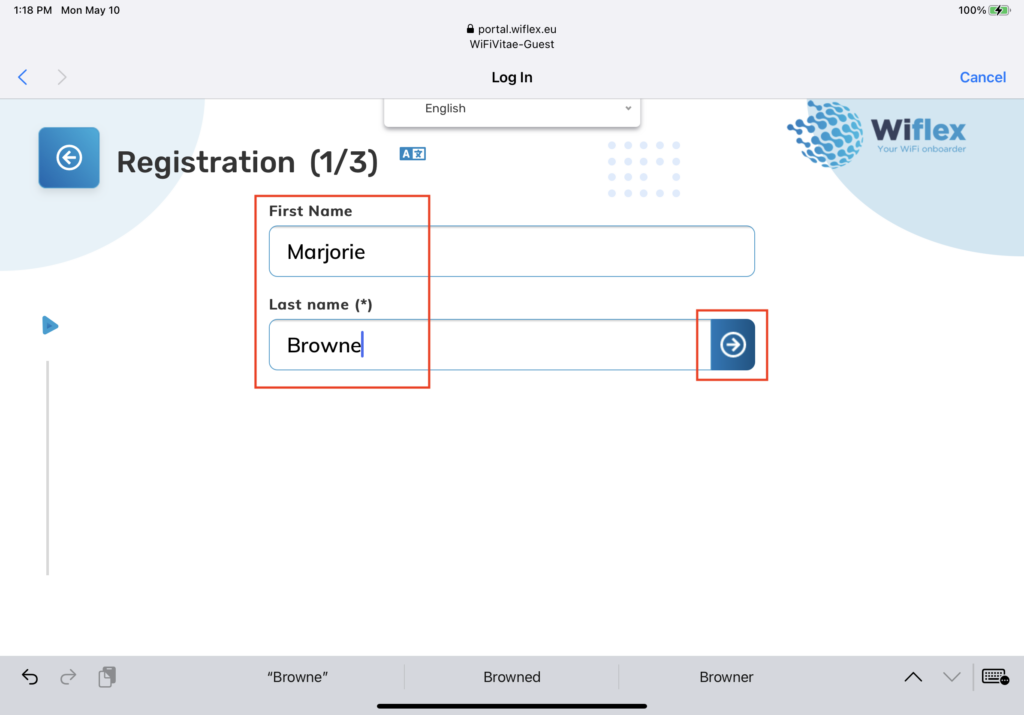
Visitors Perspective of On-boardin
Below are screen shots of a visitor entering information via the 3-stage Captive Portal/Kiosk:


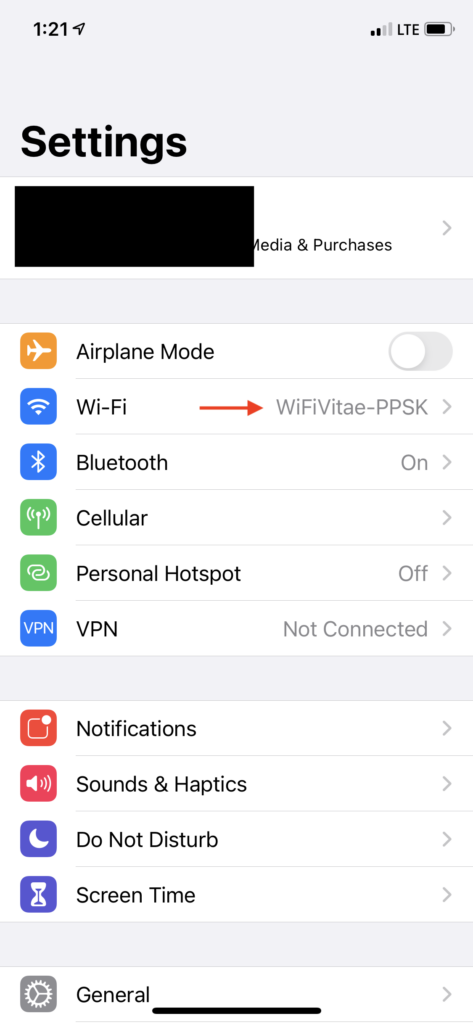
Below are examples of the visitor scanning the QR code and connecting to the PPSK-based SSID:


Below you can see currently valid visitors in the WiFlex portal (List current visitors):

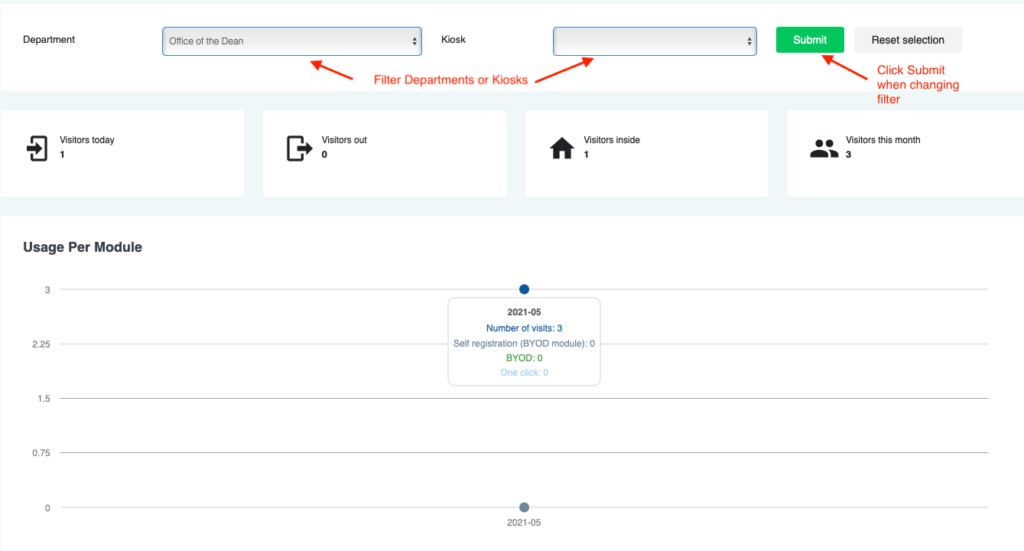
Here you can quickly see a summary of visitors in the WiFlex portal (Dashboard):
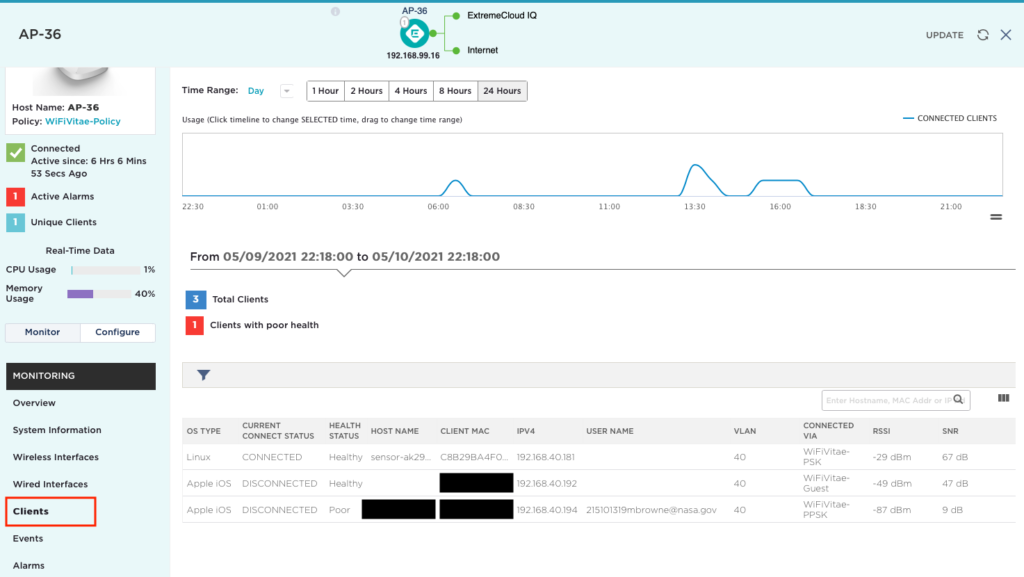
Here you can see the connected visitor clients in the ExtremeCloudIQ dashboard (Monitor > Devices > Select AP > Clients):
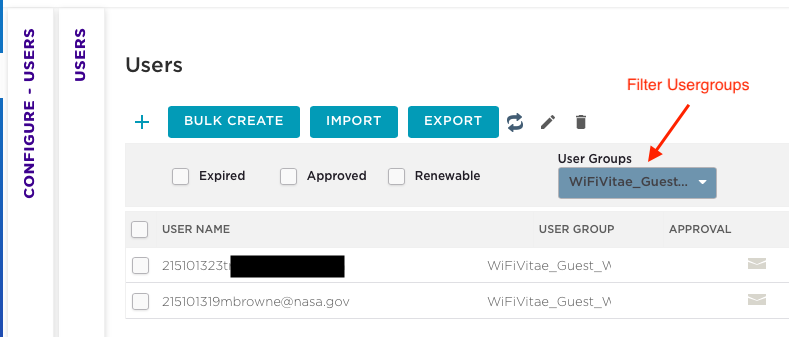
Here you can see the created visitors in the ExtremeCloudIQ dashboard (Configure > Users):
In summary, you can see that it takes a little bit of configuration to automate the important but mundane task of creating and distributing PPSKs to visitors allowing them to quickly and securely connect to your WLAN infrastructure.
Stay tuned for future blogs identifying how to further customize the on-boarding experience with WiFlex.
Slàinte!