LoRaWAN Mapper – RAKWireless RAK10701-H
This blog is part 2 of a 4-part series on LoRaWAN field mappers. For related information checkout the following posts:
LoRaWAN Mapper – using WisToolBox (iOS)
LoRaWAN Mapper – using Helium Console
This blog expands on the setup process for the RAK10701-H. For more information on LoRaWAN in general, check out the LoRaWAN Mapper – Overview blog. For more information on the RAK10701-H hardware continue reading or checkout the RAK10701-H datasheet.
RAK Wireless RAK10701-H Overview
Helium is colloquially called “The People’s Network” and consists of about 1 million LoRaWAN gateways deployed by the community across the globe to form the largest LoRaWAN network in existence. Users connect gateways to their internet connections, allowing LoRaWAN devices to connect through community members’ networks to respective LoRaWAN network and application servers.
It’s a community driven, open-source block chain network designed to expand wireless coverage globally for IoT devices. To build out Helium, new gateways are ideally placed in areas not currently served, accomplishing two goals: expanding network coverage and maximizing the credits earned from the gateway. Helium mappers are useful tools to find ideal locations and determine if new sensors are within range of an existing gateway.
One of many off-the-shelf mappers, the RAK10701-H is a field mapper from RAKWireless. It differs from the RAK10701-P in that it comes with plug & play support to integrate directly with Helium while also supporting 3rd party mode.
RAK10701-H – Pre-configured to integrate with HELIUM (no case)
RAK10701-P – PRO mode (same as LIGHT, hard case included)
RAK10701-L – LIGHT mode (no case)
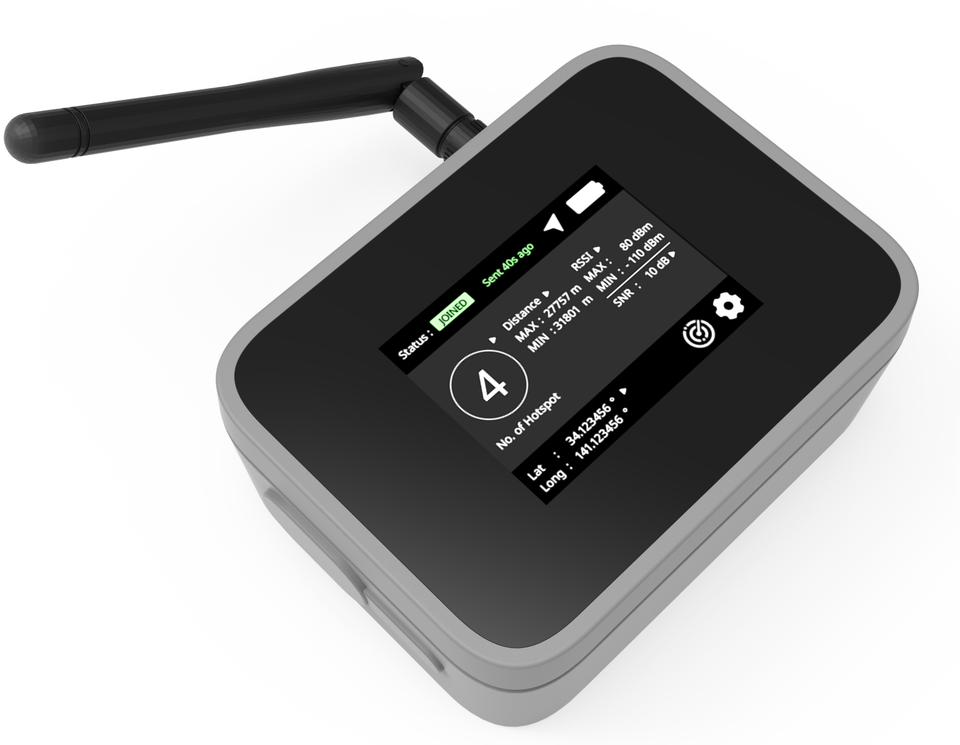
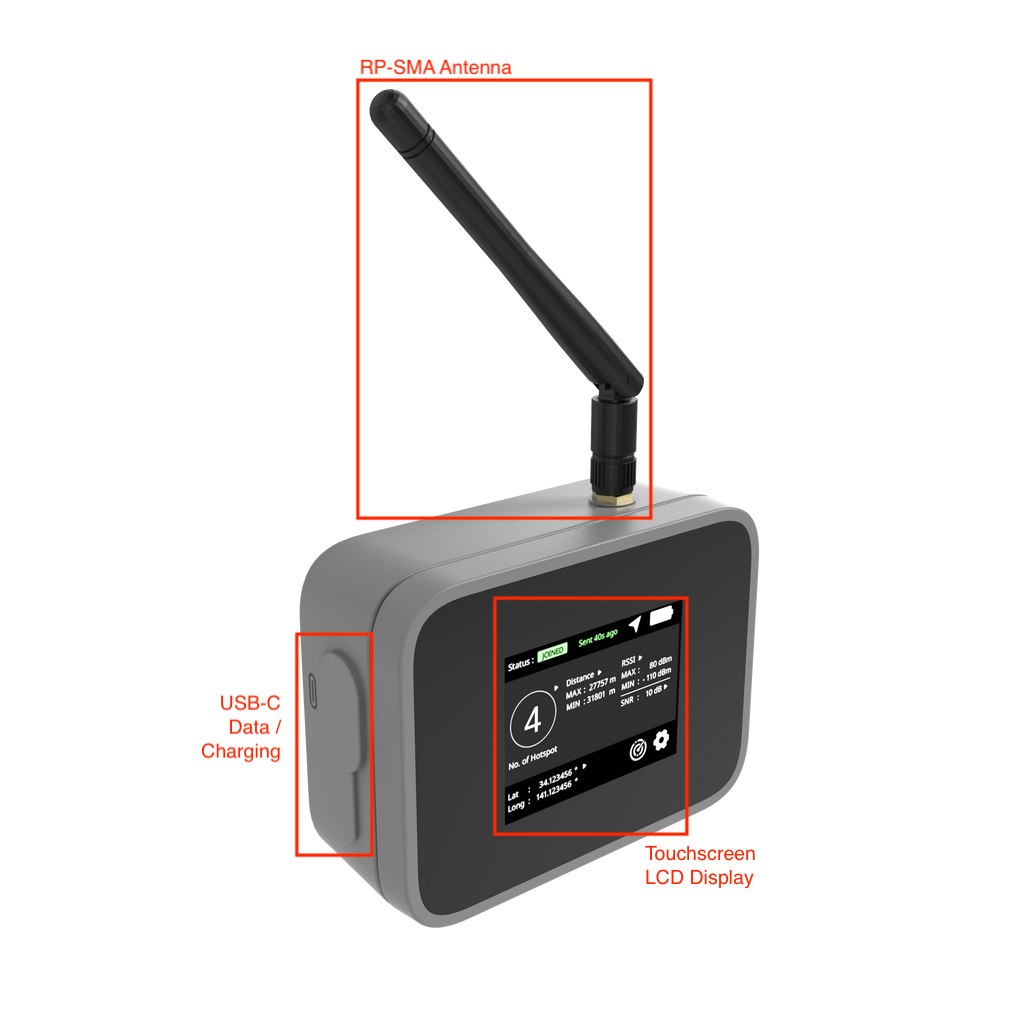
This field mapper is a small, portable, battery-powered device with a touchscreen display allowing mappers to monitor GPS co-ordinates, number of reachable gateways, along with their respective parameters such as: RSSI, SNR, and min/max distance. Additionally, there is an SMA port to connect various external antennas and a covered USB-C port for charging.
Key Features
- Supports LoRaWAN regions RU864, IN865, EU868, US915, AU915, KR920, AS923
- Works with Helium
- Already registered on the Helium console
- Free DC to use the Field Mapper for Helium
- Low power mode and physical button to deactivate the screen when moving
- Easy configuration with WisToolBox
- Shows number of gateways/hotspots in range
- Shows min and max RSSI levels
- Shows min and max distance to gateways/hotspots in range
- Discovery mode to create a map showing the Field Mapper location and the location of the detected Helium Miners.
- Powered by 3200mAh battery
- Rechargeable over USB-C connector
- 320×240 TFT touch screen
- 2.3dBi external antenna
- Operating Temperature: -10 ℃ ~ 60 ℃
- Storage Temperature: -40 ℃ ~ 80 ℃
Lastly, when ordering the RAK10107, be sure to order the model for the appropriate regulatory domain using the dropdown list on the ordering page. It does come with a band appropriate antenna, but there are options to order antennas with higher gain.

Using the RAK10701-H Field Mapper
The RAK10701-H Field Mapper uses a TFT Touchscreen LCD and one push button at the side. There is also an external LoRa antenna port with an RP-SMA connector and USB-C port for charging or connecting to a mac/PC. It’s a good practice to ensure an antenna is connected before turning on your device.
To turn on the device, it’s necessary to hold the power button for at least 5 seconds. Text and graphics will appear on the screen signalling the button can be released.
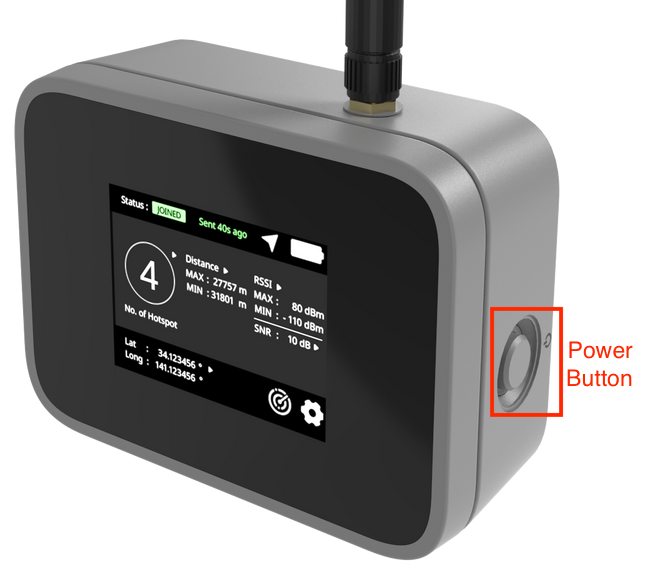
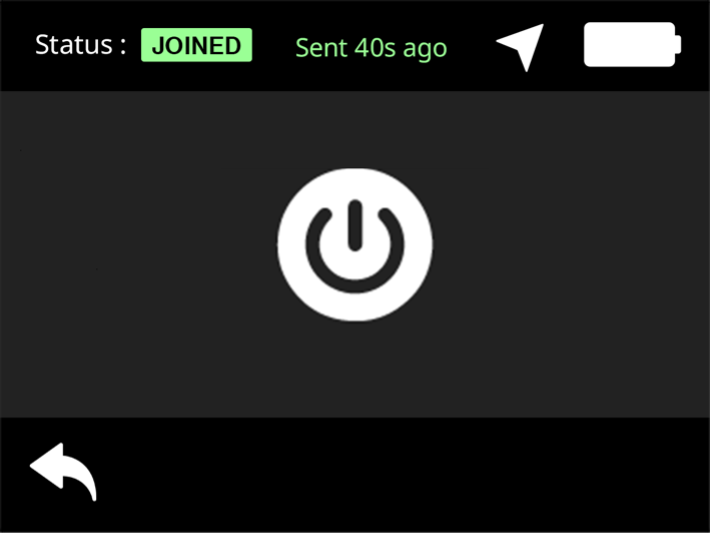
Follow the same process of holding the power button for 5 seconds to power off the device and tapping the power button that appears on the touchscreen display.
Once the device is powered on, use the touchscreen display to interact with the device.
There are various sections that you can tap on from the main screen that will expand into more detailed screens while other sections simply provide the display status and monitor indication. The status indicated is located across the top.
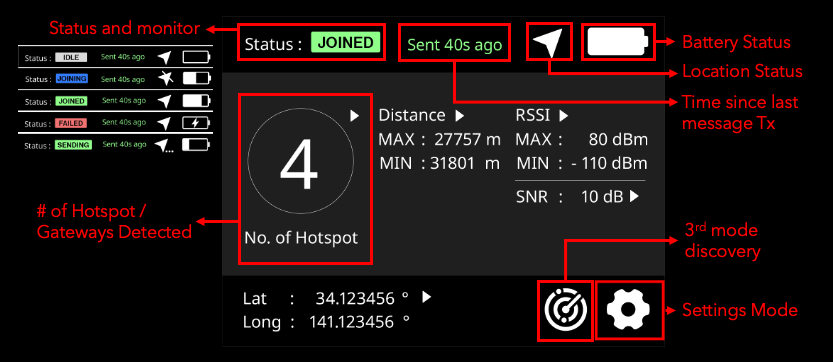
Status:
- IDLE: RAK10701-H Field Mapper state is in between the previous uplink and the next uplink. The duration of IDLE depends on the interval configured on the device.
- JOINING: RAK10701-H Field Mapper is trying to join the network. This status is triggered when a Join request is sent.
- JOINED: RAK10701-H Field Mapper successfully received the Join to accept the packet. This status will be displayed until refreshed when new data is sent.
- FAILED: RAK10701-H Field Mapper failed to join the network. Triggered by receive timeout. There might be no available gateway reachable by the Field Mapper.
- SENDING: RAK10701-H Field Mapper’s data such as GPS is being uploaded via an uplink. It will be displayed until the reception is completed or timed out.
The field mapper must obtain a GPS fix to receive valid data. The hotspot / gateway count will only update once the device sends and receives a successful uplink and downlink message from the server. As GPS is involved, indoor devices will not be able to receive satellite signal and will not have latitude and longitude coordinates.
A forced uplink can also be triggered by double-clicking on the power button of the RAK10701.
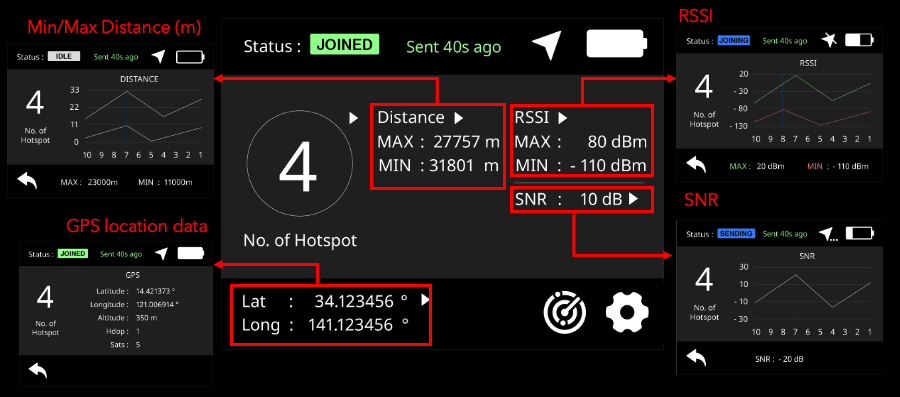
In the main body of the main screen, one can find four data sections that can be expanded into plots by clicking on the respective section.
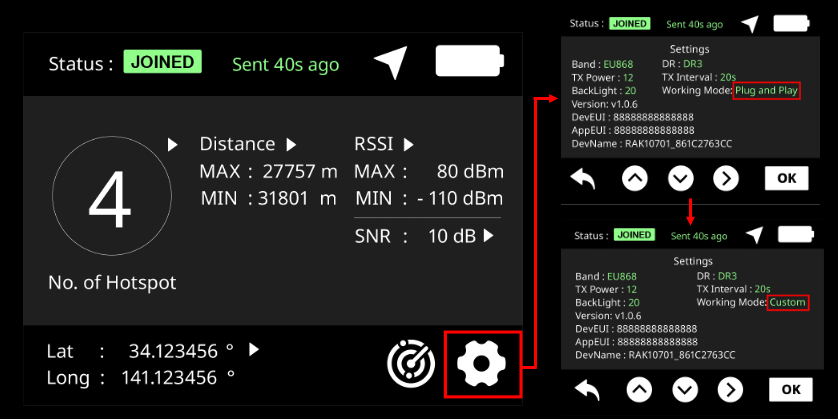
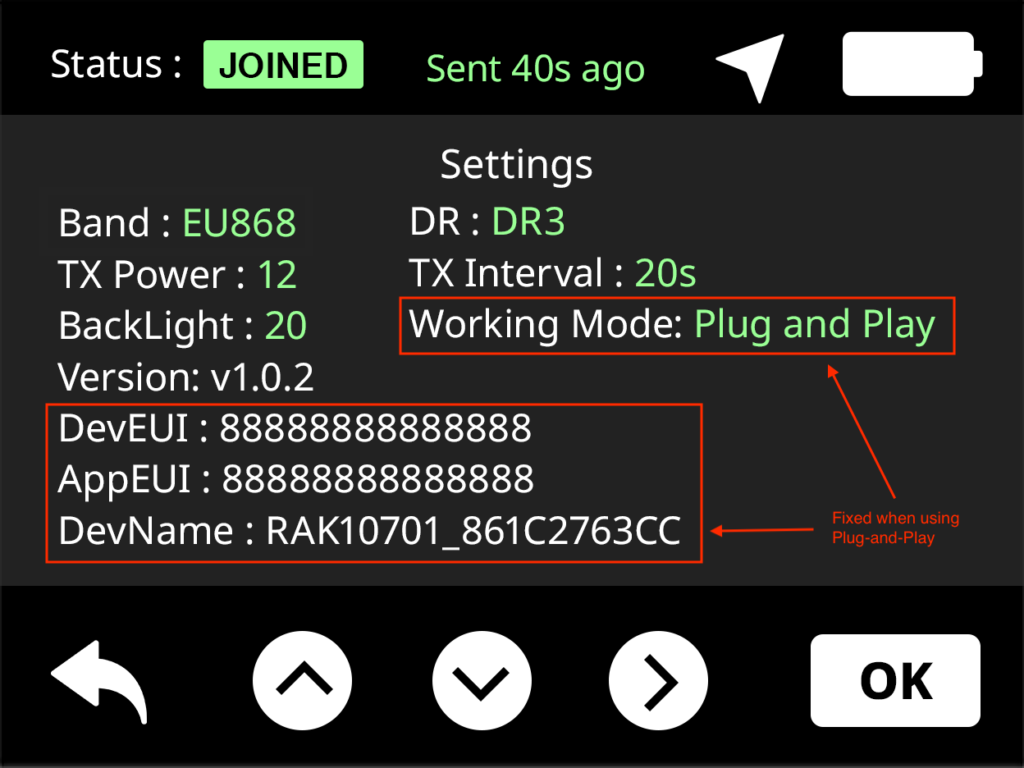
Clicking on the settings button opens the setting screen. Use the directional arrows to navigate across values shown in green, which can be edited.
Parameters that can be modified are shown in green on the touchscreen and are detailed below with important ones in bold:
Band: Sets the regulatory domain for channel / bandwidth support, refer to table below.
Tx Power: Transmit power of LoRa radio. DO NOT exceed regulatory limits.
Backlight: Set touchscreen brightness.
DR: Data Rate
Tx Interval: Transmit Interval for sending messages – more frequent intervals provide more accuracy but generate more messages (messages cost money).
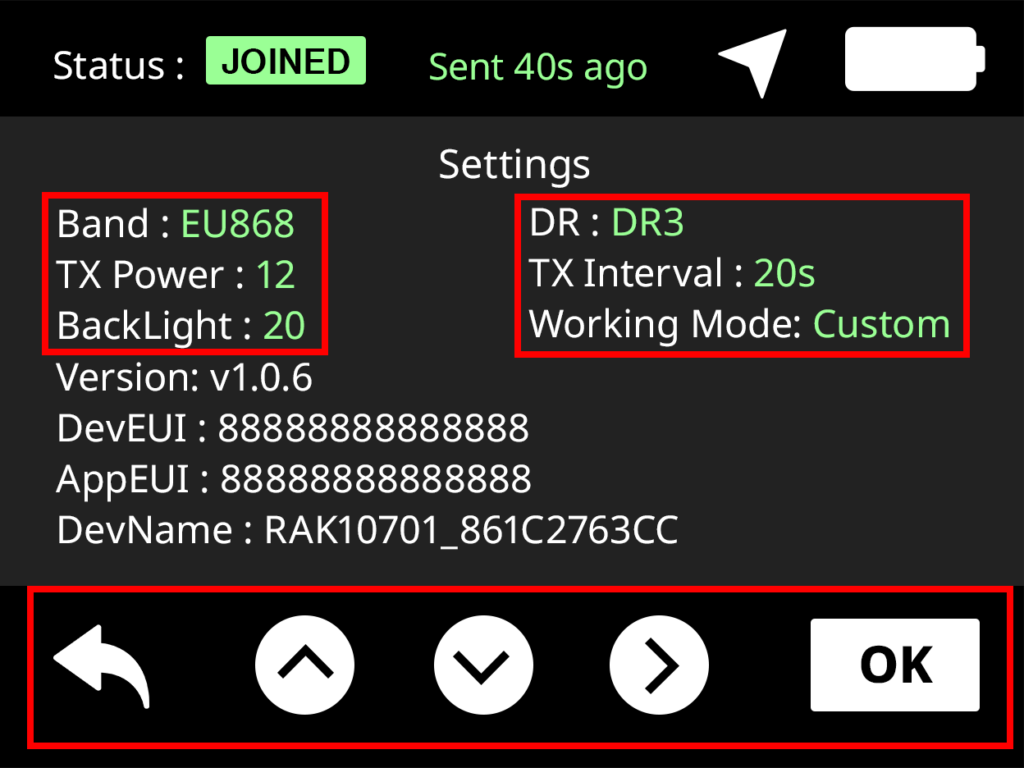
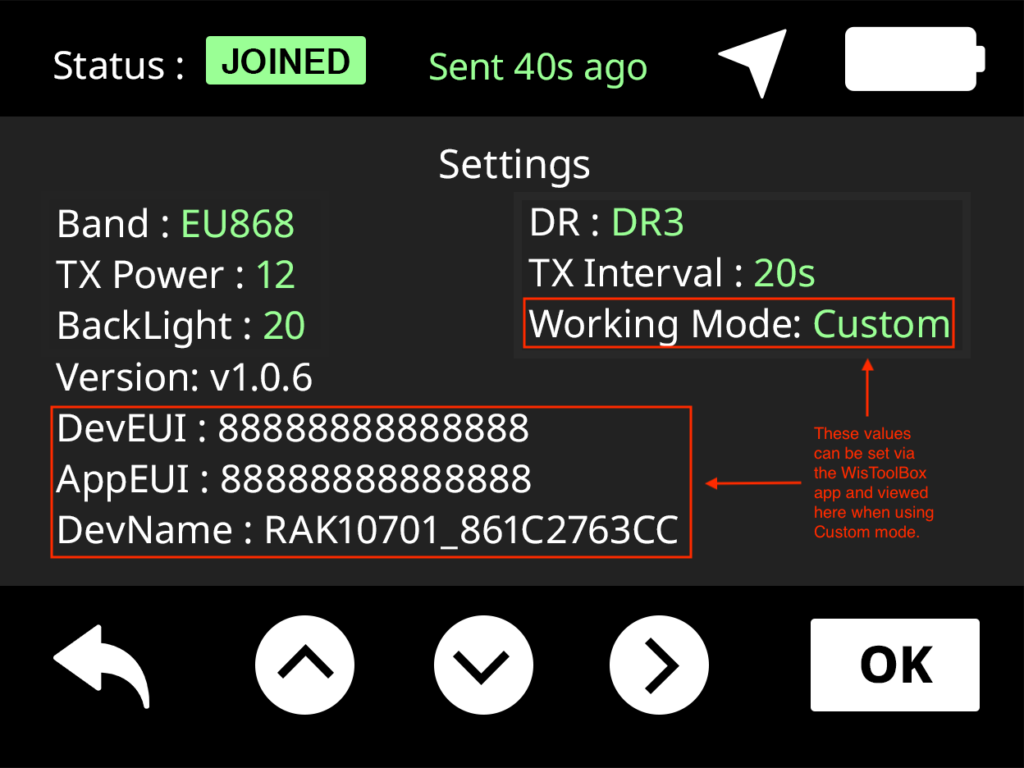
Working Mode: easily switch between profile modes, requires device reboot.
- Plug-and-play (default mode) – device is automatically configured to work with Helium. Out of the box and doing nothing else, you can search for your device by DevName:
- Custom mode – use WisToolBox to configure device settings to connect to custom public or private network/application servers. Any changes made with WisToolBox will not be displayed until switched to custom mode.
To learn more about how to configure the RAK Wireless RAK10701-H using WisToolBox, check out the next blog in this series: LoRaWAN Mapper – using WisToolBox (iOS).
Slàinte!
Resources
RAK Wireless RAK10701-H Datasheet
RAK Wireless Field Tester for LoRaWAN RAK10701-P/RAK10170-L
RAK Wireless RAK10701-H QuickStart Guide
https://docs.rakwireless.com/Product-Categories/WisNode/RAK10701-H/Quickstart/#product-configuration